Search This Blog

Sunday, April 28, 2013

Rawkin Homemade Sushi with Wasabi


I crave sushi about 5 times a month, unfortunately we only go out for sushi about once every 2 months. So you can see my dilemma, my cravings are not being satisfied! Oh the horror! But seriously I love sushi, it is one of my favourite meals and when I eat it, I eat a lot. That’s why I love going out for sushi at DK Sushi House here in Moose Jaw, because they have 'all you can eat' for $24.00 per person. We usually get a group of 8 people together to share the endless rolls, which leads to us complaining of how full we are when we leave. My brother in law Sean usually brings up that One time we made him eat the last piece, 9 months ago, that sent him over the edge of fullness. Something that we thought he would have gotten over, but apparently not!

So one night I stopped by Ashley’s house after work and after talking for an hour, I got the craving for some sushi. I mentioned it to Ashley and her eyes lit up with excitement, she wanted to go to! But she wondered if they would make her rolls without rice in them, she just wanted the nori and the vegetables. We figured we would call and ask before going down to make sure they would and success, they said they would! We didn’t get ‘all you can eat’ because it was just the two of us, but we definitely left full!

Me eating my seaweed salad, and Ashley's no rice sushi rolls!
While there we got to talking about making our own homemade sushi, raw and cooked. I had tried making traditional sushi before with Devon, but it was really soggy and I ended up just scraping off the rice and veggies and eating it like a stir fry. So naturally I was a little apprehensive about making it again. Ashley suggested that we try making raw sushi with cauliflower rice instead, she had noticed someone else had made it and was interested in making it herself.

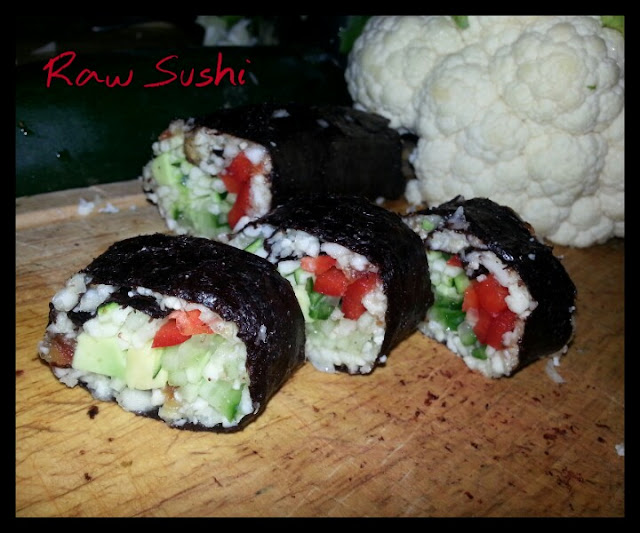
The next day I was still craving sushi and thought about just making my own. Heck I am not made out of money, so going to Sushi House again was out of the question. Luckily I had cauliflower in the fridge and was curious about how it would turn out. So I got to work on ricing the cauliflower in my Vitamix and thought “how is this going to stick together?”…. Dates, of course! So I threw some chopped up dates in and pulsed until well mixed. I rolled one up, tasted it and thought ‘WOW! Ashley needs to taste this!’ So I immediately texted her to get her butt over to my house for an amazing supper! Little did I know, Ashley was going to SuperStore to get ingredients to make raw sushi too! Great minds think alike!

We were both really satisfied with the result of the sushi, the only thing is you have to eat it immediately or else the nori wrappers get soggy. That could have to do with the quality of the paper or with the water content of the cauliflower, either way, you have to basically roll ‘em and eat ‘em.
 
Ingredients 6-10 rolls
1 pkg raw nori papers
1 head of cauliflower
5 majool dates, pitted and diced
1 red pepper
1 avocado
1 small zucchini
½ cucumber
1 bamboo rolling mat

Thinly slice all of the vegetables, using a mandolin or your knife. Rice cauliflower in high speed blender, only pulsing. Optional step, remove cauliflower from blender and pour into a bowl, take a couple paper towels and try to extract as much water as possible. Throw back into blender and pulse the dates in.
Lay out nori paper on a bamboo rolling mat, the longer side parallel to your body. Spread out a thin layer of cauliflower rice, in the middle of the paper lay equal amounts of vegetables, try not to add too much or it will be difficult to roll up. Using the rolling mat, roll up the paper tightly. Using some water to seal off the edge.
I like to have the seam of the paper on the bottom of the cutting board while cutting. Also it helps to wet your knife before cutting too!
Cut into sections and eat immediately! Serve with soy sauce, wasabi or ginger and enjoy!

After I wrote this post we went out again for sushi a few weeks later and Ashley brought something that I totally fell in love with: homemade wasabi! It tasted just like the typical green stuff you get from the restaurant, only this was all natural. I mean who would think of making their own wasabi and bringing it to a sushi place? My brilliant sister Ashley, thats who. So here is the link to her site to get this super easy recipe so the next time you make your own raw sushi or when go out you can bring your own too!

Thanks for reading!
Xoxo -N
Tuesday, April 23, 2013

Cherry Chocolate Energy Balls

Mmm I love cherries! They are for sure my favourite fruit and if I could, I woud eat them every single day! Well I guess I almost do, because I found frozen cherries at Super Store and now I have cherries in a lot of my morning smoothies!

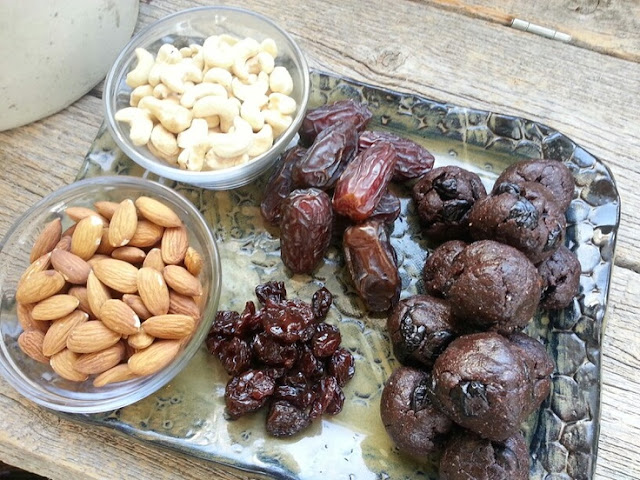
I got the idea to make these from Alternate Roots Organic, they make about 5 different energy balls and their chocolate cherry ones are by far my favourite, and in close second is the mint chocolate chip. After buying them from the store a couple times I thought “I could probably make these!” So I got looking on the internet and came across a link to “Make your own Lara Bars”, that got my attention because the energy balls were basically just that – round Lara Bars. So I clicked on the link and wow, they were super simple to make too! Just almonds, dates and raisins, really basic ingredients that I already had in my cupboard.
I of course made some changes to the recipe wanting it to be a chocolate cherry flavour, but that was easy enough! I decided to add some cashews in there along with the almonds to make it a little more nutty flavored. For me I think just almonds would have been too bitter tasting. Also I added some cocoa powder for the chocolatiness and I substituted the raisins for cherries! Presto chango! Yummy cherry chocolate balls!

I would highly recommend using a food processor for this recipe and not using a standard blender or magic bullet. The mixture becomes very thick and could burn out your motor, even in my Vita Mix it stalled out and I had to give her time to cool off.

Ingredients - 12 balls 

½  cup almonds
½ cup cashews
¼ cup cocoa powder
½ tsp vanilla powder
10 dates, de pitted
¼ cup dried cherries

In a high speed blender or food processor, pulse almonds, cashews, cocoa powder and vanilla into a flour. Add the dates and pulse until well blended. Stir in dried cherries and form into balls. Refrigerate for 20 mins. Enjoy!

Thursday, April 18, 2013

The New Cauliflower Pizza, Vegan Gluten Free


This weekend we had the pleasure of babysitting our nephews, Brody and Carson. I always look forward to spending time with them because this is the age when they still want to hangout with us and they will still give us hugs and kisses. However, I think the one who benefited the most out of this get together was our dog Lucy. She is an attention whore and can con anyone into giving her a scratch on the head or belly. So when two young boys who love to hug and pet her come over, she is in doggy heaven! 
We had them for a good portion of Sunday, so I had to decide what to make them for supper. The first thing that came to my mind was pizza! What kid doesn’t love pizza? So I asked them what kind they would like and their response was:
Brody: Ordered in pizza
Carson: Cheesy bread.
…..
Well that didn’t get me very far. So I asked again, clarifying that we are making our own and that they could put WHATEVER they wanted on it. Carson still answered cheesy bread and Brody answered pepperoni. Success! I got one of them to answer. Now I just had to explain to Carson that he was going to get cheese pizza instead of the cheesy bread. He took it well and continued to jump off the stairs.
As I was driving I thought about the what kind of pizza I wanted and I really didn’t feel like eating all of that dough. I still wanted all of the toppings that comes with pizza, I just wasn’t feeling the bread part. Well, what about the cauliflower pizza crust that everyone is talking about? Meh, I have tried and it wasn’t that successful, plus with two boys in the house I didn’t feel like experimenting with something like that. That’s when an idea so awesome hit me! Like, so genius I had to look it up to see if anyone else had thought of it before, and to my luck I couldn’t find any other example!

Why not just skip making the crust and just put everything on top of the cauliflower?! Instead of making the crust and getting it to stay firm and crispy, just pile it all on a chunk of cauliflower! So I went from eating a whole pizza crust to myself, to eating almost a whole head of cauliflower to myself. What a great idea, and a healthy one too!
 
Okay so now you are thinking how do I do this? Well, you just take a sharp knife and cut out 1’’ steaks from the middle of the cauliflower you can probably get around 3 or 4 ‘steaks’ from each head, depending on how big it is. And yes I know, there are going to be holes in the ‘steaks’, but that’s okay, only some of the sauce will leak through. 

So the next time you are craving pizza, but want to eat a little healthier, try this out and see what you think. I personally loved it and they are really easy to throw together!

Ingredients – 2 servings (4 pizzas)
1 large head of cauliflower
2 tsp coconut oil
1 can of pizza sauce
3 mushrooms, diced
1 red pepper, diced
4 kalamata olives, de stoned, diced
1 cup spinach
1 cup Daiya cheese, mozzarella

Pre heat oven to 375 degrees.
With a sharp knife slice through a whole head of cauliflower and make 1” thick ‘steaks’, about four individual chunks.
Lightly coat bottom of cauliflower with coconut oil and bake in the oven for 10 mins.
Chop up veggies while they are baking.
Remove the cauliflower from the oven. They should be slightly fork tender.
Spread the sauce all over the top of the cauliflower and put on the toppings. Finishing it off with the cheese.
Bake in the oven for another 10 minutes.
Serve and enjoy!

Thanks for reading!
Xoxo -N

Sunday, April 14, 2013

Vegan Eggplant Soft Tacos

Truthfully I am not a big Mexican food fan. I love guacamole and salsa but tacos, burritos, enchiladas don’t really do it for me. I will eat them for sure, don’t get me wrong, but I never really crave them.

Yesterday however I was thinking about what I wanted for supper and a couple things came to mind but I wasn’t too sure. That’s when I came across a recipe for eggplant tacos, and I that piqued my interest. I just happened to have an eggplant in my fridge that was on its last couple days, so I had to use it ASAP. Well why not eggplant tacos. That’s when I realized that I interpreted the recipe wrong. I thought they used the eggplant as the taco shell, but instead they just had a corn tortilla and eggplant inside. I guess that could work too, but my original way sounded like a lot more fun!. I love trying new food and different ways to eat the norm, and this was the perfect example.

When buying your eggplant you are looking for a large, firm and a heavy one. You don't want to be  too hard or too soft because too hard means its not ripe enough and too soft means its too ripe. Also this is when size matters, because the bigger your eggplant is the wider your tacos will be!

So not only are these gluten free, egg free, everything free (except eggplant and oil) they cut down on carbs, fat, and salt and are a fun new way to look at tacos. I will warn you now, they are messy! But that shouldn’t stop you from trying them out, if anything it should entice you! Because who doesn’t love playing with their food.
My recipe is just a jumping off point, if you wanted you could add black beans, zucchini, hot peppers, anything  you think that would make a great taco, go for it. Also, if you have taco seasoning already at home then you could use that instead of the spices I have listed. I didn’t have any in my house so I thought, why not just make it!

Ingredients - 2 servings
1 large eggplant - 8 slices
2 tbsp coconut oil
1 red pepper
1 onion
5-8 mushrooms
1 lime
¼ - ½ cup of walnuts
½ avocado

Taco Seasoning
1 tsp chili powder
1 tsp garlic powder
1 tsp red pepper flakes
1 tsp oregano
1 tsp paprika
1 tsp cumin


Pre heat oven to 350 degrees. Using a vegetable mandolin or knife slice the eggplant into ¼ inch thickness. Melt 1 tbsp of coconut oil and lightly coat the egg plant on both sides. Salt and pepper to taste. Put into the oven for 10 minutes. While they are in the oven, slice up your red pepper and onion using the mandolin. If you have one this will save you so much time! In a mixing bowl, add all of the spices together, stir until well combined. Chop up the mushrooms and throw all of the vegetables into a hot frying pan with remaining coconut oil, lime and desired amount of taco seasoning. Fry veggies until soft (the vegetables will probably be done at the same time as the eggplant) Garnish with avocado! Serve immediately and be prepared to get a little messy! Enjoy!

** If you don’t have eggplant but have a large zucchini, that would work just as good! 
** If you are looking for a vegetable mandolin I saw one at Super Store for $10.00. I got mine at Costco for $40.00 and it works awesome.

Thanks for reading,
Xoxo -N

Thursday, April 11, 2013

Vegan Meatless Balls, Gluten Free


You gotta love living in Saskatchewan! All of this snow, that I feel will never melt, does not represent Spring at all. So with all of this snow and cold weather, I am still craving hot comforting meals instead of the fresh, cold, spring salads that would be typical for April.
I won’t lie though, I am happy that it is still winter for one reason and one reason only, Lucy is not covered in mud. With Spring, comes melting snow and muddy backyards, two things that do not go well when you have a long haired, large dog. So in a small way I love the snow and my clean dog and house, but truthfully I would love to put my winter jacket away and not have to worry about breaking my ankle on the ice.

This recipe came about on Saturday afternoon while watching the documentary Fat, Sick and Nearly Dead.  It’s about a guy named Joe who wants to transform his life from fat, sick and nearly dead into fit, happy and healthy. He was 310 pounds and wanted to make a big change in his life, so he did a juice cleanse for 60 days to see what would happen. I won’t tell you anymore but you can guess that it turns out great. I really really really suggest you watch this with your WHOLE family. Yes even your kids. Joe lays out the movie in a way that anyone can grasp, including little cartoons explaining your immune system.

So anyways we are sitting there and I start to crave a smoothie so bad, I mean the guy is drinking freshly squeezed juice and it looks so good! Well, great minds think alike because Devon says “I'm craving a smoothie” Boom, I hop in the kitchen to whip us up a delicious snack and a commercial for Diners, Drive Ins and Dives comes on with a clip of spaghetti and meatballs.
Devon – ‘Now I want a smoothie and spaghetti and meatballs.’
Me – ‘Okay, let’s have them for supper, but could we just try making vegan ones?’
Devon – “Ya sure let’s give them a shot!’

So Devon searched the internet for a recipe and came across this one on My Vegan Cookbook and I had to agree it looked good. Now knowing me I don’t follow recipes, so I got the gist of it and went my own way. I didn’t make a ton of crazy changes but the main thing I changed was making them Gluten Free. Chelsea was coming over for supper that night and it would be good if she could actually eat the food we made.

If you have any leftover rice this is a really good recipe to try, because you want the rice to be a little dry and really who likes eating left over plain rice? The lentils you can either buy canned or you can use dry lentils and boil them on the stove for 45 mins to an hour. I would also suggest using fresh parsley rather than dry, because these are only cooked for 20 mins you still get the freshness of the herb after they are cooked.
 
These do get quite messy when you are rolling them, but hey no big deal because there is no raw meat or eggs in them, so just lick your fingers and see how it tastes. That is probably the biggest benefit about making vegan meatballs, is that while you are stirring in the ingredients you can taste test all the way through. Again there are no worries about eating raw meat or eggs, its already cooked rice and lentils with some herbs and spices!

I am honestly really happy with this meal, probably one of my favourite things I have ever made. We made it with zucchini noodles and an organic pasta sauce, two simple ingredients that don’t cost that much! The next time you are buying tomato sauce, read the label to see if there is any added sugar. That is one of the main reason I buy organic, is because there is no sugar added to the sauce, and I can pronounce all of the ingredients. I have copied the lists of ingredients from Prego and the Presidents Choice Organics Primavera Sauce so you can see the difference in what they put in.

PREGO TOMATO PUREE (WATER, TOMATO PASTE), DICED TOMATOES IN TOMATO JUICE, SUGAR, CANOLA OIL, SALT, DEHYDRATED ONIONS, SPICE, DEHYDRATED GARLIC, CITRIC ACID, NATURAL FLAVORING.

Presidents Choice Primavera: Water, tomato paste*, diced tomato*, carrots*, celery*, zucchini*, red peppers*, extra virgin olive oil, sea salt, green bell peppers*, minced onions*, garlic, parsley*, oregano*, black pepper*
* = organic

This is something we can simply change in our grocery carts that is one step towards making healthier decisions.  Plus I hate it when labels say ‘Natural Flavourings’ What the heck is that? If you are vegan, gluten free or have any allergies you have to be wary of this because fish, gluten and nuts are all natural. So if you are concerned call the company and ask to make sure you can eat it.

Ingredients – 10 Large Meatless Balls
1 ¼ cup of cooked rice, white or brown
½ cup of cooked lentils (do not use kidney beans or black beans)
5 mushrooms, minced
2 tbsp of parsley, minced
1 lemon, juiced
½ cup ground flax
¼ cup brown rice flour
½ garlic clove, minced
2 tbsp of soy sauce
2 tbsp of olive oil
1 tsp balsamic vinegar
1 tsp of chili powder
Dash of red pepper flakes
Dash of liquid smoke (optional)

1 jar of your favourite tomato sauce
1 zucchini per person, thinly sliced using a mandolin or a vegetable peeler

Combine all ingredients together and mix until well blended. If you find it too wet, add more ground flax, if too dry add some water.
Roll into balls, place on a lightly greased cookie sheet and bake at 350 degrees for 15 mins. Add tomato sauce into a frying pan and heat up. Add the meatless balls and simmer for 5-10 mins, letting them soak up the juices. Serve over a bed of zucchini noodles!
Thanks for reading,
Xoxo -N


Thursday, April 4, 2013

A Stell-Raw Banana Caramel Pie


Have you ever eaten a whole pie all to yourself? I have! And now you are wondering what kind of pie, aren’t you? It was a lemon meringue, homemade by my grandma at Christmas a couple years ago. It all started off with one bite, then another, then holy crap it’s all gone. I went from having a bite of dessert to having THE dessert.  

So this Easter I wanted to make a dessert that not only I could eat but both of my sisters could eat too. Almost all desserts that get brought to big family suppers contain either eggs, dairy or gluten, all of the things my sisters and I don’t eat. So what could I make? I had a ton of bananas in my house, so something banana. That’s when I thought of a banana caramel pie, and I was going out on a limb and make it raw too!

What I love about this pie recipe is that it doesn’t take long to prepare and it only contains four ingredients! It is gluten free, dairy free, egg free and can be any type of nut or seed crust you want. So if somebody in your family has a peanut allergy, then you can use almonds, or vise versa. But the big kicker about this pie is that it is delicious! I had my family try it and everybody raved about how good it tasted. Even grandma, who has never tried anything like this before, gave me rave reviews. To see her reaction my sister Naturally Ashley video tapped her reaction, click here to see it!

I came up with the name Stell-Raw Banana Caramel Pie because this Easter we lost our Rottweiler Stella to gastric dilatation. Needless to say, this Easter has not been that joyous and writing this post is really hard. She passed away so suddenly that it will be truly hard to get over her loss, she was such a huge part of my life and I miss her so much.  So I thought that I would name this pie after her, mainly because one of her favourite foods was bananas. I would be in the kitchen peeling a banana and she would be able to hear it from anywhere in the house. I am not surprised though because I would always give her my last piece, when it came to her I was always such a push over. So in memory of my little, I dedicate this post to you Stella, I miss you girl! 


Ingredients

Crust
1.5 cups of cashews, or your favourite nut
10 majool dates, pited and soaked in water at room temp for 1 hour

Carmel Sauce
2 bananas
8 dates
¼ tsp vanilla, powder or extract

Filling
7 bananas

This is quite a simple pie to make. In a food processor or high speed blender, blend the cashews and dates together. Pour into a pie pan and using parchment paper flatten evenly all the way around. Put in freezer for 15 mins.

While crust is freezing blend the bananas until smooth, then add dates and vanilla. Set on high and puree until creamy and smooth.

Take crust out of the freezer and thinly slice 3 of the bananas and place neatly on the crust. Then thinly slice the other 3 bananas and gently fold in with the caramel sauce. Pour on top and then top with one more banana sliced.
Depending on how full you want the pie you can add or subtract the amount of bananas. I used seven!
Place in the freezer for at least 3 hours and serve immediately. Enjoy!


An upclose picture of the curst and the caramel sauce.

Stella and her sister Lucy!