Search This Blog

Showing posts with label chocolate. Show all posts

Tuesday, April 23, 2013

Cherry Chocolate Energy Balls

Mmm I love cherries! They are for sure my favourite fruit and if I could, I woud eat them every single day! Well I guess I almost do, because I found frozen cherries at Super Store and now I have cherries in a lot of my morning smoothies!

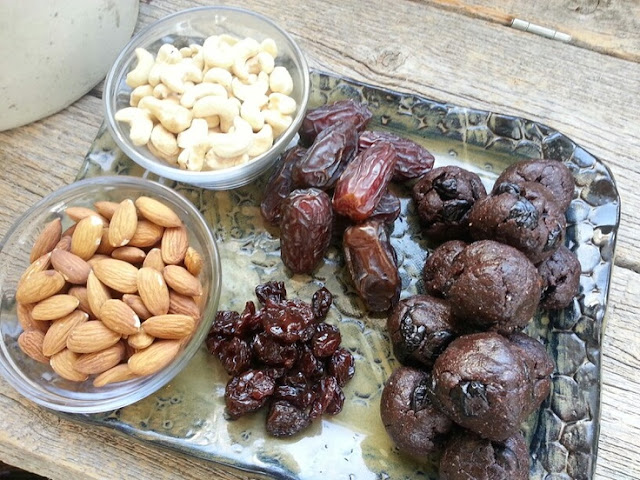
I got the idea to make these from Alternate Roots Organic, they make about 5 different energy balls and their chocolate cherry ones are by far my favourite, and in close second is the mint chocolate chip. After buying them from the store a couple times I thought “I could probably make these!” So I got looking on the internet and came across a link to “Make your own Lara Bars”, that got my attention because the energy balls were basically just that – round Lara Bars. So I clicked on the link and wow, they were super simple to make too! Just almonds, dates and raisins, really basic ingredients that I already had in my cupboard.
I of course made some changes to the recipe wanting it to be a chocolate cherry flavour, but that was easy enough! I decided to add some cashews in there along with the almonds to make it a little more nutty flavored. For me I think just almonds would have been too bitter tasting. Also I added some cocoa powder for the chocolatiness and I substituted the raisins for cherries! Presto chango! Yummy cherry chocolate balls!

I would highly recommend using a food processor for this recipe and not using a standard blender or magic bullet. The mixture becomes very thick and could burn out your motor, even in my Vita Mix it stalled out and I had to give her time to cool off.

Ingredients - 12 balls 

½  cup almonds
½ cup cashews
¼ cup cocoa powder
½ tsp vanilla powder
10 dates, de pitted
¼ cup dried cherries

In a high speed blender or food processor, pulse almonds, cashews, cocoa powder and vanilla into a flour. Add the dates and pulse until well blended. Stir in dried cherries and form into balls. Refrigerate for 20 mins. Enjoy!

Tuesday, February 26, 2013

Chocolate Zucchini Muffins, Vegan Gluten Free

Recently I have had the need to bake something, mainly because I have been craving something chocolate. So I was looking around the internet for some chocolateness and came upon this recipe for chocolate muffins. The recipe looked fairly simple and I had most of the ingredients at my house which is usually a deciding factor for me. If the ingredients list has something new that I have to buy I am reluctant to use it. Mainly because if I have to buy a new ingredient that I will only use in this recipe, what happens if it sucks?! Then I have this random container sitting in my cupboard taking up space, and my kitchen is small as it is.
So after I made that amazing hashbrown casserole (found here) I decided to keep the ball rolling and try out this new recipe. I got the recipe from a vegan website but true to form I needed to make some changes to it. I never do things by the book, its not fun that way. I used zucchini to reduce the amount of oil I used, also I used carob power along with the cocoa to, again, reduce the cocoa in the mix, plus I had it in my cupboard and figured I should use it. If you want to look at the original recipe click here.
The muffins turned out really good, especially for gluten free and vegan. They are a dense muffin but still full of chocolaty flavour. The next time I try them I am going to do a regular gluten batch and I am going to put more zucchini in them, just to see how they compare. Once those are done I will let you know how they turn out!
Ingredients - Makes 12
1 cup of fresh orange juice, about 5 oranges
½ cup packed brown sugar
1 cup of rice flour
1 cup of coconut flour
1 tsp of baking powder
½ tsp of baking soda
¼ tsp of salt
¼ cup cocoa powder or carob powder
½ tsp of cinnamon
¼ cup of coconut oil, melted
¼ cup of zucchini, minced
½ cup of vegan chocolate chips

Directions:
- Preheat oven to 350 degrees F. and get out muffin pan and liners.
- In a medium mixing bowl combine juice and sugar together, whisk together until well combined.
- In a medium mixing bowl, whisk together flour’s, salt, baking powder, baking soda, cocoa and carob powder and cinnamon.
- Add oil and zucchini to juice/sugar mixture and whish until well combined
- Add flour to oil mixture and stir until well blended together. Stir in chocolate chips, you can ever save some to top each muffin with.
- Divide batter between muffin cups and bake for 18-20 minutes.
- Let cool for 10 minutes and serve!

Thanks for reading!
Xoxo -N

Wednesday, December 19, 2012

Super Saver Brownie and Cookie Bites

Have you ever been really excited about trying a new recipe that you slot out time on your days off, take a special trip to the grocery store to get the ingredients, all to find out that the recipe SUCKED BIG TIME? I have and it sucked big time.  

I had wanted to make gluten free, vegan brownies and chocolate chip cookies from scratch because I am a sucker for pre packaged baking mixes. I thought it was time to tie on my apron, roll up my sleeves and do it like my grandma used to. So I searched the internet for some of the best recipes, printed them off and bought the ingredients.
 
The night my sister came over with her awesome egg nog was the night I had decided to bake. I had just finished the cookies when she arrived and I was super disappointed with them. They were dry, crumbly and a bit tasteless. For me if I am going to eat cookies, they better be damn good cookies!! None of these eating bad cookies just because, I want them to be amazing so I don’t feel bad about eating half of the plate!

After that disappointment I moved onto the brownies, which I thought were going to be so much better than the first disaster. NOPE! No such luck for this gal! The taste was a bit better than the cookies but they turned out super dense and super dry. I was really sad now, all of this time, effort and money wasted. Well actually my husband didn’t mind the cookies, he said that they weren’t THAT bad after eating 4 of them. But I didn’t want THAT BAD COOKIES, I wanted AWESOME COOKIES! So technically all was not really lost.
 
Then Ashley and I had a great idea. Why waste the two batches when I  could salvage them and make bite sized brownie and cookie bites. My spirits were up again , I COULD and WOULD have something delicious to eat after all. I used the cake ball method and crumbled up the brownie mixture and my sister thought that bananas would be the perfect binding ingredient. I agreed, who doesn’t love bananas and chocolate. Then I thought about adding dates, they will add more sweetness and even more binding!

Now, I am not saying to go out and purposely make a bad batch of brownies or cookies just to make these. Just, if you ever come across that horrible situation where that one recipe turns to crap and you are about to throw it out, know that you have another option to save all that time and money!

Vegan, Gluten Free Brownie and Cookie Bites
1 8x8 Dry Batch of Brownies or 12 Dry Cookies
1/4 cup of Coconut Milk  
2 Medium/Large Bananas
5 Dates, Soft

Blend bananas and dates together in the blender. Crumble the brownies/cookies into a bowl until all of the lumps are gone. Gradually mix the banana mixture into the bowl until you get a nice moist batter, if you have left over bananas dont worry, just drink them! Roll the batter into bite sized balls and place in the frige to firm up. I also rolled mine in coconut for a special touch!

*I did make the cookie ones, but my nephews ate them all before I could take a picture!!
*You could also roll them nuts, chocolate chips or any other type of toppings!
*If you dont have dates, you could use 2 tbsp of peanut butter! YUMMMMM!
*This would work also if you had left over cookies or brownies that have gone dry (when does that happen? not too sure but I bet it does on occation). Just use less bananas and dates!


Thanks for reading,
xoxo -N

Tuesday, October 30, 2012

Super Soft Banana Brownies, Vegan and Gluten Free

Something that I really love about my jobs is that I have Mondays off. I can get SO much done on Mondays, like cleaning the house, laundry and even quilting! Maybe its because my husband isn't home...

So in celebration of having a day off I was in the mood to bake something, but I wasn't quite sure what. I started to think what I was in the mood for, sweet? savory? sour? And what I came up with probably has something to do with Halloween: I thought CHOCOLATE. Not that I haven't been sneaking my vegan chocolate bars in every couple days (or maybe hours, I don't know if there will be any for the kids) but I was thinking something more substantial. How about Brownies, I thought to myself? Those sound awesome (I'm really smart)!! They will be the perfect snack for the quilting retreat I have this weekend! In which I will finally be posting something about fabric, sorry guys Food has just taken over my life lately I havent got in enough time in my sewing room. 

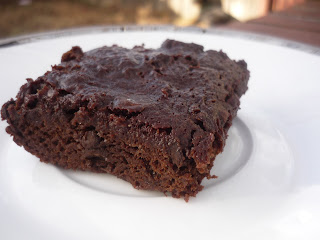
Gluten Free Brownie! 
I have made a lot of brownies in the past, but just recently I started doing the black bean brownies. This is where you take a can of black beans, blend them up, add them to a premix brownie package and bake them. SUPER SIMPLE, vegan, and really good. However, they can become dry, which is my pet peeve of brownies. So I got to thinking what would make them moist?

Regular Brownie!
Bananas!! The perfect solution to any baking dilemma. They add moisture and a great flavor to any baking and I just happen to have 8 bunches of bananas in my house right now. Next I thought about adding coconut milk, its dairy free and will add a rich smooth texture to the bananas. 

Now that I had my idea I just needed my box of brownies. Superstore has a great Organic Brownie mix that only has 5 ingredients and they are dairy and egg free. This is the mix I use for my black bean brownie mix. But then I thought, what about doing a gluten free mix too? You can never have too many brownies. So I bought both!!

Ingredients 

Regular Brownie! Looks so good!
1 Brownie Mix
2 Medium Bananas
1/4 cup of Coconut Milk 
1/4 cup of Chocolate Chips, vegan

Pre Heat oven to temperature listed on the box. Blend the bananas and the coconut milk together in a blender until smooth. Gradually add banana mixture to the dry brownie mix and chocolate chips, until you get the consistency of a brownie batter. If you are using large bananas you might end up not using all of your wet mixture, and thats okay. Basically you just want to add enough to get it wet and thick. You don't want it to get too soupy or else they wont set.
Place in the oven for the allotted time on the box. Let cool. ENJOY!

I did this for both boxes, the Organic Regular and the Gluten Free one and the Gluten free one turned out a little stickier, but for me thats not a bad thing. 
I loved the results of them, I don't think I will go back to making the black bean ones. 

Stella finds it hard to look at Mom
This was going to be the end of my post, however my husband informed me this afternoon that our little girl Stella broke into our kitchen and ate ALL of the Gluten Free ones. Luckily I had tried one late night so I can tell you that they turned out great. I guess I wont be taking those to the Quilt Retreat!

So I just had to post some pictures of her! And as Ron Burgundy would say: 
I am not even mad: that's amazing! 


She looks so sad


She feels really bad, and she promises never to do it again.


Thursday, October 18, 2012

Chocolate, Banana and Peanut Butter Vegan Cheesecake

For my birthday I was trying to decide what to do about the cake. Seeing as I am vegan and my sisters and dad are gluten free, the options of a cake are quite restricted…or so I thought! When I was on Amy’s site looking at her chocolate orange tarts, my friend Jesie drew my attention to a Chocolate Peanut Butter Banana Cheesecake. I am pretty sure I did a double take. What, its vegan?! Are you sure? Let me check the ingredients… well looky here, Amy has done it again! When you click on the link below that takes you to her website, you will see what an amazing cake she has created. It looks like a ‘regular’ cake, something that anyone would love to eat.


After seeing this amazing cake I thought. I love peanut butter! And Chocolate! And Bananas! So naturally my brain went - - - this is the perfect birthday cake. Anyone who doesn’t like the combination of nuts, chocolate and banana must be crazy, and simply wouldn’t get cake. Also luckily none of my friends have nut allergies.


I am not one to follow instructions well, in cooking and in sewing. When I see ingredients and sewing instructions my first thought is ‘how can I change this to suit me and my likings?” In looking at the list of ingredients I noticed that she used Agave, which is something that I don’t like to use in baking. Instead I chose to use dates. I like the idea of dates for the fact that they aren’t processed and they aren’t as sweet.
To substitute the dates for agave, blend equal parts water to dates until a smooth consistency, like syrup. Then you can use it as a one to one replacement, ¼ cup date puree for ¼ cup agave syrup ect…

I also didn’t have any coconut meat for the cream topping. Instead I used ¼ cup of coconut milk and ¼ cup cashews and blended them together. I am pretty sure the coconut meat would have thickened up the cream more, but the cashew mixture worked just great!


The last thing I did differently is a chocolate topping. I had left over coconut milk and wanted to use it up, and what would make this cake even better? More chocolate! Chocolate always makes things better.
I heated up ½ cup of coconut milk on the stove and when it came to a boil, I poured it over ¾ cup of vegan chocolate chips. Stir them together until smooth and spread it over the top of the cake. I had made sure the cake was in the fridge over night and was set. If I had poured the chocolate over the cake before it was chilled, it would have melted the cake. Place the cake back in the fridge for an hour to chill the chocolate, and thats it, my take on Amy's Vegan Cheesecake. The different flavors were really rich and creamy without being to overwhelming and everyone loved it! My cake did not turn out as pretty as Amy’s but it sure did taste great!

Thanks for reading!

Xoxo - N

Tuesday, October 9, 2012

Chocolate Orange Hazelnut Tarts, Vegan and Gluten Free

This year for Thanksgiving I wanted to bring a dessert that I would be able to eat and that I could share with everyone. Looking on Pinterest I found the most amazing dessert recipe by Amy of Fragrant Vanilla Cake. The title of her recipe is what initially hooked me, Dark Chocolate Orange Hazelnut Tart, if that doesn’t say decadence, I don't know what would.


 So I clicked on the picture and went to her site to see if it was something I could pull off. Thankfully, her ingredients and instructions were really simple and easy to follow! I have posted her recipe link below, so you can see how amazing hers turned out.  

http://fragrantvanillacake.blogspot.ca/2012/05/dark-chocolate-orange-hazelnut-tart.html


Enjoy Life is the brand of chocolate that I used in making my tart. They are listed as Vegan on the label as well as gluten free!  They are the most amazing vegan chocolate chips ever! I honestly think that these taste just as good as any chocolate bar out there. They are also nut, soy, wheat, mustard, sulfites, fish and sesame free!  


There are a couple minor things that I changed in order to make Amy's recipe:

  1. I used Quinoa Flour instead of the almond flour or hazelnut meal. The flour is mild tasting, so it doesn’t change the taste of the dessert, also its still gluten free!
  2. I substituted Coco Natura Coconut Sweetener for the brown sugar/maple sugar. Its just as sweet, and it's 100% natural and free from additives and artificial flavorings.
  3. Instead of the suggested Mandarin Napolean or cognac, I just so happened to have a mini bottle of Grand Marnier. 
  4. Finally instead of doing one large tart, I made mine in muffin tins. I love making individual sized portions, they are easy to serve and they are super cute!! However, because the portion size change when doing muffin tins, I had to double the filling in order to get a good ratio of crust to filling. To ensure the tarts were easy to remove I greased the bottom of the tins with coconut oil. 

I was extremely happy with the outcome of my mini chocolate tarts. The crust was sweet and solid, a perfect compliment to the soft, rich taste of the chocolate filling. Everyone at Thanksgiving was complimenting them and how they couldn't believe that they were dairy and gluten free. Some thought that the crust was too sweet, which is something that is easily altered in your own rendition of Amy's recipe. 
I really suggest you make these for your next family get together. They are really easy to make and yet pack a really big punch of flavour.

Thanks for reading!

xox -N