Search This Blog

Showing posts with label dairy free. Show all posts

Saturday, January 4, 2014

Vegan Fondue feat. Cheezy Bites in Vegan Beer Batter

This Christmas my husbands family decided to celebrate a little early so everyone could be together. With families growing its hard to all get together at Christmas time. So we celebrated on Sunday night with an extra twist to tradition, instead of the typical turkey dinner we had a fondue party!
My mother in law has been hosting fondue parties since she was 19 years old, so we all knew that it would be well stocked with different types of fun dipping sauces, meats and cheeses, with of course a chocolate and caramel for dessert.

Now being vegan I wasn't participating in any of this, but non the less I was still excited because I was getting my very own pot this year! One that I could experiment with and try some new and fun things. I haven't got to fondue since I turned vegan so this was a pretty big deal to me, because for those of you who have fondued you know how fun they can be.
Sadly, we got to Devon's parents for brunch and ended up munching all day, which can be great but not when you have a huge fondue feast waiting for you that night. So by the time supper rolled around I was still very full from the days festivities so I didn't get to experiment like I wanted to. BUT! I did get to try the cheese balls, something that I knew I had to try. Devon's mom Mary B. already had a batter recipe that was tried and true so I just subbed out the eggs for a flax egg and voila vegan batter!

When I tasted my first bite of this cheezy goodness, I actually was on the brink of tears. For I haven't had something that good in a long time.... something so heavenly, so gooey, so melty, so amazingly non-vegan (but vegan!!!) cheezy goodness that it was definitely cry worthy. I made about 7 of them and had to call it quits. I should have stopped at one, but seriously who would do that?

So if you have a deep fryer, or are headed to a fondue party soon, I HIGHLY suggest you try these bad boys out, you wont be disappointed!
 
Vegan Beer Batter
3/4 cup of flour
1/4 cup cornstarch
1 tsp baking powder
2 tsp salt
1/2 tsp nutmeg
2 flax eggs: 6 tbsp. water, 2 tbsp. ground flax
1/2 cup beer
Mix together all dry ingredients. Let your flax eggs sit for about 10 min to set before adding them into the dry mixture, then add beer. Mix until well combined. Best if you can let the batter sit for 1-2 hours before using.

The vegan cheese I used was a block of Daiya in cheddar flavour. I cut it up into 1/4 inch blocks, dipped them into the batter and fried them for about 2 minutes or until golden brown. Like most fondue/deep frying, let them sit for a minute or two because the insides will be hot!

Thanks for reading!
xoxo -N


Tuesday, December 3, 2013

Veggie Lentil Loaf {vegan gluten free}

If any of you who are reading this blog, you know some days you just want to share your recipe but you don’t feel like typing up a whole blog story to go along with it. Sometimes its just a huge pain in the ass and you don’t feel like doing it.
So this is me not doing it, sorry guys no funny stories today, just a kick ass recipe for a veggie lentil loaf that is hearty, filling and has a sweet and sticky glaze that will have everyone wanting seconds.
 
The first time I made this, I made it without the oatmeal and it came out a little moist and it kind of fell apart when I took it out. So I added to the list 1 cup of oatmeal to help bind it together more. I hope your family loves this as much as Devon and I did! 
 
 
Veggie Lentil Loaf
1 large can of lentils
1 yellow onion, diced
2 celery stalks, diced
2 carrots, diced
1 clove garlic, minced
1 tbsp of coconut oil
3 tbsp of ground flax
½ cup warm water
1 cup of gluten free quick oats (I used Only Oats)
2 tbsp of chili powder
1 tbsp of oregano
Salt and pepper to taste
 
Sweet and Sticky Glaze
4 tbsp of balsamic vinegar
4 tbsp of ketchup
 
Or 
4 tbsp of balsamic vinegar
3 tbsp of tomato paste
1 tbsp of maple syrup.
 
Instructions
-Pre heat the oven to 375 degrees and grease a loaf pan.
-Sauté the onion, celery, carrots, and garlic in a frying pan for about 7 mins or until browned.
-While that is cooking combine the flax and water and let sit on the counter until thickened.
-Once the veggies are done cooking, in a large bowl combine everything together (not the Glaze) and mix the crap out of it until everything this combined well.
-Spoon into your greased loaf pan and spread out until smooth.
-Finally pour glaze on top and smooth out.
-Bake for 40 mins.
-Let cool for 5 mins and serve!

Thanks for reading!
xoxo -N

Tuesday, November 26, 2013

Le Pizza Fries

Muhahahah I have suckered you in to another pizza recipe! You maybe wondering "is this woman mad? This is the like 20th pizza post!" Why yes, I am mad... mad about pizza!
I didn't even like pizza back when I wasn't vegan, it was just another supper idea that didn't really catch my attention. But ever since I turned vegan I am addicted! I love creating new fun ways to eat pizza, some healthy like my spaghetti squash pizza boats found here, or some not so healthy like my newest post...PIZZA FRIES!!!
Yes I said pizza fries. Two of the greatest foods ever, combined into one amazing dish that will have you wondering why you never thought of this before. I know I did!
Well its simple, bake fries in the oven until toasty brown.
Top with your favourite vegan pizza toppings, like:
  • hot peppers
  • tomatoes
  • olives
  • mushrooms
  • mock meats
  • onions
  • pineapple
Sprinkle with some Daiya Mozzarella, broil it for 5 mins (be careful you don't burn it like I did!)
Heat up some pizza sauce to dip in and viola you got yourself supper! Or a snack, or maybe ever breakfast! This would be the perfect college breakfast!
If you are feeling generous you could even share this dish at a party with your friends. If not eat this in the car before you go in and blame your dog for eating it while you were getting ready (if you don't have a dog, I cant help you).


Thanks for reading!
xoxo -N

Sunday, November 17, 2013

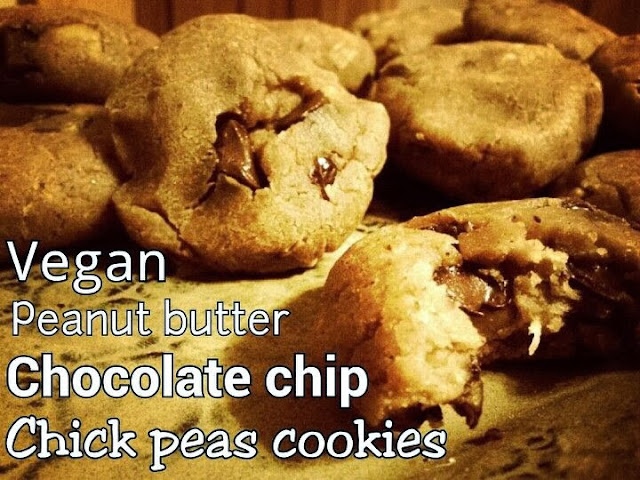
Vegan Peanut Butter Chocolate Chip Cookies

Who doesnt love cookies right out of the oven, especially on a snowy Saturday night while hanging out with your sister! We both had nothing to do last night so naturally we decided to hang out together. I just got US Netflix so I asked her to come over so we could watch some of our favourite tv shows and some stand up comedy.

While on the phone she stated that she was craving chocolate and I suggested we make some cookies. I had a can of chick peas in my cupboard and I have heard of these chick pea cookies and was curious to try them. Cheslea was game for trying out something new so she looked up a recipe and came over.

What I loved about the recipe that she chose,was that it was so simple to make and didn't call for that many ingreidents. Basically chick peas, peanut butter, chocolate chips and a few other basics. They turned out warm, gooey and super delicious and we may or may not have eaten about 10 each. Yes they were that good.Plus they are vegan, gluten free and if you substitute the peanut butter for almond butter it's nut free too! The only thing that could have made them better was a glass of Chocolate Almond Milk.


Vegan Peanut Butter Chocolate Chip Chick Pea Cookies
1 large can of chick peas
3/4 cup peanut butter
1 tsp of vanilla powder
4 dates soaked in water until soft or 1/2 cup maple syrup
1 tsp of baking soda
1/2 cup chocolate chips (more if you love chocolate

Pre heat oven to 350 degrees, and line a baking sheet with parchement paper.

In a Vitamix or food processor combine all of the ingredients together, except for the chocolate chips. With the dates: de seed them and add a spash of water to the mix.

Blend the mix until smooth. Make 1 tbsp size balls and place them some what close together because they dont spread out. Bake for 12 mins and enjoy!!


Thanks for reading!
xoxo
 
-N

Tuesday, October 22, 2013

Spaghetti Pizza Squash Boats

I love pizza! For those of you who follow my blog you can attest to that with all of my pizza posts. And I can guarantee that this will not be my last rendition of this amazing dish, more on this at a later date!

Last Friday night we went to Jen and Sean’s house for a deck warming party and we decided to order a whole bunch of pizza instead of doing our traditional TGIF party where everyone brings an appetizer. I loved this idea because I really didn’t feel like making anything. There was probably 12-14 of us, so we decided to get 6 extra larges for everyone to share, me getting my own pizza because I am special! I always order from Family Pizza because I know that their crust and sauce is vegan and I think that they have the best pizza for the best price. So what did I order? a tomato, onion, hot pepper pizza and when its delivered I sprinkle some Daiya on top and throw her in the oven. BOOM awesome pizza… and its extra large! Now I didn’t eat it all, don’t worry, I only had about 5 pieces leaving some for a snack later and supper the next day.
We planned on going back to their house the next day for the Rider game so I didn’t feel sad that I left it there over night. Knowing that it’s a meatless, cheese-less pizza, makes me feel pretty safe that no one would eat it. Well I was wrong, dead wrong. Not only was it eaten, but there was only 1 piece left! Out of almost a whole pizza!? I was super shocked! Who would eat this? Then I realized that there were drunk men, still drinking after we left and really who really cares what kind of pizza it is… when you are drunk pizza is pizza.

So what is another way to satisfy your pizza craving… spaghetti pizza!! Well Spaghetti Squash Pizza! I was originally going to do this on a large zucchini but Devon said he would rather have it in the squash so I complied because that also sounded great! It is super simple to make and even easier to devour! I would HIGHLY recommend, like super highly, baking the squash before hand for at least 25 mins. Or else you will end up playing the waiting game like me…I waited an hour and a half for mine to be done. Apparently they cook A LOT faster when they are face down in the oven.


Spaghetti Squash Pizza Boats
1 large spaghetti squash
1 can pizza sauce
1 tomato, diced
¼ cup hot bell peppers, diced
½ onion, diced
½ cup black olives
1 cup Daiya, mozzarella
** you can substitute any ingredients for your favorite pizza flavors

Split the Spaghetti Squash in half and de-seed. Lightly oil the halves, lay them face down on a cookie sheet and bake in the oven for 25 mins at 375 degrees. Chop up the veggies and once the squash is almost fork tender layer inside with the pizza sauce, veggies and then top it off with the Daiya. Bake for another 15 mins. Take out of the oven and start scraping away at the sides so the squash turns into spaghetti, throw it into a bowl and enjoy!!


Thanks for reading!

xoxo -Nikki

Autumn Calling Soup


October is such a great month, I know I have said this before but it really is. Not only is there the changing of the leaves, my birthday, Halloween but it’s the perfect time to eat the squashes and pumpkins that come straight from the garden. I unfortunately do not have a garden because my backyard is a) too small b) gets little to no sunlight because of the trees c) my dogs would tear it apart!! So I rely on the wonderful farmers market on River Street. Its not huge but it fits the needs of us Moose Javians very nicely by supplying us with a great assortment of veggies and some fruit. 
The last time I was there (picking out the pumpkin and butternut squash for this soup) it was there final get together because here in Saskatchewan it gets pretty cold in October. This news makes me so sad, because I now have to go back to eating grocery store cucumbers and tomatoes, which just are SO NOT the same. Oh the hurdles I have to face on a day to day basis. *cue in the song Don’t Cry For Me Argentina* its really a horrible day for my taste buds to have to eat the grocery store knock offs, they do not taste anything like the real thing!
But I digress. Back to this amazing soup. It is so earthy, creamy, rich and warm that it just gets down to your bones and makes you feel all good inside. Soup is truly the ultimate way to ward off the winter time chills, because not only does it warm your hands by holding the bowl, but your face, mouth and your tummy. Plus if you are like me it really fills you up because you end up eating half of the pot in one sitting (its that good!!!)

Autumn Calling Soup
1 small pumpkin – I used a sugar Pie pumpkin, if they are out of season you could use a can of pumpkin puree too.
1 butternut squash
2 tbsp coconut oil, melted
7 stalks of celery, diced
3 carrots, diced
1 yellow onion, diced
1 clove garlic, diced
6 cups of water (you can add some vegetable broth if desired)
1 can coconut milk
1 tbsp cumin
1 tbsp coriander
1 tsp cayenne pepper
Salt pepper to taste

Pre heat oven 450 degrees.
Split the pumpkin and squash in half and de-seed each. Using the melted coconut oil brush on the insides of the squash/pumpkin halves. Place face down on a cookie sheet and bake in the oven for 25 mins, or until fork tender.
While those are in the oven, dice up your veggies and in a large soup pot fry them in the left over coconut oil on medium/high heat for 15 mins.
Pour in coconut milk and spices and cook for 5 mins, letting the flavours all meld together.
Remove the squash/pumpkin from the oven and using a knife, cut away the skin. Be careful these will be hot!!! You could wait until they cooled but I am impatient so I just used a oven mitt.
Throw the squash/pumpkin and the water into the pot and stir in. cooking for another 5 mins, again letting the flavours all meld together.
Finally blend the soup in a high speed blender until smooth! Serve with roasted pumpkin seeds on top and enjoy!
Thanks for reading 
xoxo -N


Friday, October 4, 2013

A Very Vegan Thanksgiving: As seen on Global TV Regina


I am super excited to announce that Ashley Clark from Naturally Ashley featured my Quinoa Stuffing recipe on Global Regina News this morning . Ashley was brought on to the show to talk about how to veganize your Thanksgiving meal this holiday season. Her recipes included my Qunioa Stuffing and her raw vegan pumpkin pie.

With the holidays are upon us you start to get excited about spending time with your family and eating a ton of amazing food. However, some of us get stressed out in the kitchen trying to get the food all done on time, while others are relaxed because they know they just have to bring buns to moms house and everything else will be made for them. Well, this year my sisters and I plan on helping out my mom in the preparations of this huge meal and the stress that can come with it. So we divided up the dishes and took some of the responsibilities off my momma (aren’t we great kids!) Plus it doesn’t help that all three of us are vegans, with Ashley being gluten free/raw vegan and Chelsea being gluten free/vegan, it can make for a lot of bowls on the table.


So what were we going to bring?
Ashley – salad, raw vegan pumpkin pie
Nikki – vegan/gluten free stuffing, vegan gravy, S’more Pie
Chelsea – mashed potatoes, cranberries 

I am most excited for my stuffing, cranberries and my sisters raw vegan pumpkin pie. Those are definitely the three top things I crave when Thanksgiving comes around. Before we discovered quinoa my mom would always make a rice stuffing for my gluten free family members, it was good and everyone like it, but I thought it was missing something. So last year when quinoa came to my attention I just knew that it would take gluten free stuffing to the next level. 
Then there is my sisters raw vegan pumpkin pie. Something that may not sound as good to you,  but trust me when you try it you will fall in love with it! It is rich, creamy and perfectly spiced just like a cooked pie is, the only major difference is the fact that it has to be served cold. To find the recipe for this awesome pie go to Naturally Ashley's blog found here. As for my stuffing I have re posted it along with some helpful tips to make your Thanksgiving vegan friendly this year!


Tips and Tricks to Make your Thanksgiving Vegan
- Mashed Potatoes: instead of using milk or butter, use almond milk and Earth Balance
- Make a mushroom gravy instead of a poultry based one *see recipe below
- Buy a mock meat substitute if you want to keep up the turkey tradition 
- For appetizers go with hummus or salsa with chips and veggies for a dairy free snack option 
-Salads are usually vegan, all you have to do is choose a dressing that is vegan and voila you got yourself a vegan side dish!
- Try to keep the meat/dairy/egg dishes away from the veggie ones, you could even prepare some of the veggie ones the night before to elevate stress 


Gluten free Vegan Stuffing
·         1 cup of quinoa
·         2 cup s of water
·         1 cup of wild rice
·         4 cups of water
·         1 white onion, diced
·         2 medium carrots, diced
·         5 stalks of celery, diced
·         1 small pkg mushrooms, diced
·         2 tbsp of coconut oil
·         1 clove of garlic, minced
·         1 cup vegetable broth
·         3 tsp of sage
·         2 tsp of cumin
·         Salt and pepper

.
First you will need to clean your wild rice and quinoa. A simple way to do that is to put it in a strainer and run cold water over it.

To make the wild rice: combine rice, the 4 cups of water in a saucepan and bring to a boil, cover and simmer over low heat for approximately 45 minutes, until the rice has opened and fluffed out. Strain out any excess water. Or if you have a rice cooker use that instead, it’s a lot easier!

To make the quinoa combine quinoa and the 2 cups of water in a saucepan and bring to a boil, cover and simmer over low heat for approximately 20 minutes, until the water has all evaporated.

Next dice up the mushrooms, carrots, onion, and celery into bite size pieces, and place the mushrooms aside for later. Heat up a medium/large sized frying pan on Medium/High heat, add your oil and sauté the onions, garlic, carrots, and celery for about 15 minutes, or until they are soft. Add the mushrooms and broth, spices and quinoa/rice mixture to the pan,  and continue cooking for another 10 minutes.
Serving bowl and enjoy!  

Gluten Free Vegan Gravy
1 medium Onion, diced
1 cup of Mushrooms, diced
1 tsp of Coconut Oil
2 cloves of garlic, diced
1/4 cup of gluten free Flour, I used Quinoa Flour
1 cup of Vegan Broth
2 tsp of Soy Sauce, Vegan Gluten Free 
1 tsp of Worcheshire Sauce, Vegan Gluten Free

In a small sauce pan saute the onions, garlic and mushrooms in oil until soft. Gradually alternate adding flour and broth to the onions and mushrooms until there are no clumps. Add the soy sauce and the worcheshire and continue to cook for another 5 mins. If the gravy is too thick then add more broth/water until you get your desired consistency. I like my gravy to have a smooth texture so I blended mine in my Magic Bullet until smooth. However, if you like the chunky texture then exnay the blender.


Thursday, October 3, 2013

Want S'more Pie, a gluten free and vegan dessert!

S’mores. A summer time favourite for many and a staple when camping. But who says it has to stop there? Why not double the chocolate and marshmallows and put it into a pie? To me, that sounds amazing especially since I turned it into a vegan S’more pie!
I got this idea about a month ago when I was making the frosting for my Charmed Cupcakes for my vegan party. When I took the icing out of the fridge I noticed that it was the perfect consistency for making a pie. *insert lightning bolt… Hey I just bought marshmallows… chocolate… S’MORES! And the rest is history!


The pie is really easy to make, it just takes some prep time and some waiting time in the fridge. So if you are wanting to make this for Thanksgiving I would suggest making this a couple days before and when you are ready to serve it just throw the marshmallows on top and broil them. That way you can save up some space on your counters and your stove. Plus I love that this is a no bake pie too, so if you do end up making it on Thanksgiving you wont have to worry about taking up room in your oven.

Want S’more Pie

Gluten Free Graham Cracker Crust
1 pkg of gluten free graham cracker crumbs
¼ - ½ cup maple syrup
¼ cup of melted coconut oil

Combine all ingredients in a bowl and stir until moist. Pour onto a pie tin and using your fingers evenly flatten out mixture. Place in the fridge for about an hour or until chilled.

Chocolate Filling
1 can of full fat coconut milk
1 cup of chocolate chips (vegan), I used Enjoy Life Brand 

Put can of coconut milk in the fridge over night. Open and remove all liquid so only the solidified coconut milk is left. Place chocolate chips in a glass bowl over a pot of boiling water and gradually melt the chocolate. You don’t want to heat up the chocolate too fast or else it will burn.

Once melted combine the hardened coconut milk and melted chocolate and stir until smooth.
Pour over chilled pie crust, making sure it is evenly distributed. Place in the fridge for 2-3 hours or over night.

Marshmallow Topping
1 pkg of vegan marshmallows

When ready to serve place as many marshmallows as you desire on top of the pie, ( I only had half a package) set pie under broil in your oven and roast the marshmallows until golden brown. Watch carefully because they will burn easily!
Cut, Serve and Enjoy!


Saturday, September 14, 2013

Easy Vegan Banana Muffins

I promised about a month ago that I would post these awesome Vegan Banana Muffins my sister in law brought to my Vegan TGIF party. Well better late than never!
Out of all the vegan banana bread/muffins I have tasted these are by far my favourite. Not only are they super moist, they are super simple to make with no complicated ingredients.
Everyone at the party was reaching for these when Jen placed them at the table, even the kids were asking for seconds and thirds! I hope you enjoy these as much as we did! Thanks Jen for sharing the recipe!


Easy Vegan Banana Muffins
1 1/2 cup whole wheat flour
1 tsp baking powder
1 tsp baking soda
1/2 tsp salt
3 large bananas, mashed
3/4 organic coconut palm sugar
1 flax egg, 1tbsp ground flax and 3 tbsp. water (let sit until thickened)
1/3 cup apple sauce

Preheat oven to 350. Line muffin tin with muffin liners.
Mix together flour, baking powder, baking soda, and salt.
In a separate bowl combine banana, sugar, flax egg and apple sauce. Fold into flour mixture until smooth (do not over mix as that will make them dry). The batter will be very thick and kinda fluffy.
Scoop into muffin liners.
Bake for 13-15 mins.
Muffins are done when they spring back when lightly tapped.
Makes about 12 medium sized muffins.

Thanks for reading!
xoxo -N

Saturday, September 7, 2013

Fresh Rolls with Low Fat Lime Peanut Sauce


I am on that mission again! Trying to find another sauce that holds up to my fresh rolls original peanut hoisen sauce. I swear it is my lot in life to try as many dipping sauces as I can, yes I am that addicted. And this new Lime Peanut sauce is pretty damn good, if I do say so myself. I am really satisfied with the results, especially since its low fat!
As usual I was craving fresh rolls for lunch while at work and I was thinking of that sweet and salty sauce that accompanies them. Which got my brain thinking about how I can adjust my original sauce to make it low fat. Cue in zucchini and you got your self a Low Fat Party! Zucchini is really the best kept secret in the cooking world. It can be used in so many ways its ridiculous.

Low Fat Lime Peanut Sauce
1 zucchini peeled
1 tbsp peanut butter
1 lime juiced
1 handful cilantro
½ clove garlic
Salt to taste

Puree in a high speed blender until smooth and serve with your favorite fresh rolls. My recipe can be found here!

Wednesday, August 28, 2013

Vegan Peanut Buster Parfait


Chocolate. Peanuts. Banana. Ice Cream. That is all...


Okay maybe not all, but that's all that's really important here. Who doesn’t love the amazing combination of peanuts, chocolate and ice cream? I bet most of you aren’t even reading this, you just want to skip to the bottom so you can eat one right now!! Let’s play a game! Let’s see if anyone is really paying attention. I love dogs, dogs are awesome, awesome awesome, awesome! Cats are great too! I love cats, catty cat, cats!..Anyone read that?  Haha!

 This dish really brings back childhood memories of my dad taking my sisters and I to Dairy Queen where I would order the peanut buster parfait. I would never finish it and I am sure my dad knew this but being the awesome dad he was he never once said “no honey you should just get the hot fudge Sunday its smaller” He knew that there was something special about ordering the PBP that a Sunday just couldn’t live up to!

So one hot summer night I was trying to figure out what to make for supper and I was coming up with a blank. I wasn’t going to turn on the stove or the oven because that would be just silly. So I opened the freezer and there was my answer! Frozen Bananas! The perfect summer time supper! I mean I don't live with my parents guys, I can have ice cream for supper. I’m kind of a bad ass.

So I whip up the banana ice cream and throw it in the freezer while I make the chocolate sauce. It probably only took me 8 mins to throw this all together which is a good and bad thing. Good because this doesn’t take long to prepare, bad because this doesn’t take long to prepare. If I had a constant supply of frozen bananas in my freezer I would probably make this every night! But when you think about it it’s not that bad, its really just bananas, peanuts, cocoa powder and dates! A pretty guilty free snack/supper if you ask me!

Vegan Peanut Buster Parfait 

2 frozen bananas – pureed into ice cream using a high speed blender

Chocolate sauce
5 majool dates
3 tbsp cocoa powder
Water
Blended at high speed, gradually adding water until you get the desired consistency.

Peanuts – you can find the Dairy Queen peanuts at Superstore in the bulk section!

I hope you enjoy this awesome Summer time treat!

Thanks for reading!
Xoxo -N

Monday, August 19, 2013

Summer Fresh Vegan Grilled Cheese

This past weekend I was lucky enough to find some fresh garden tomatoes at the farmers market, along with cucumbers, a Cajun spice mix, beets, carrots, beans, potatoes and purple garlic. Of course I was happy to bring home all of my vegetables but I was mainly happy about the tomatoes! For me there is nothing better than a fresh tomato out of the garden. It literally is one of those simple pleasures you can only experience a couple months out of the year here in Saskatchewan, so when they are in season I really try to eat as many as possible because I know it’s going to be short lived.

When I got home I was contemplating what to eat for lunch and then I remembered that I had just bought a new kind of Daiya from Safeway, the Swiss Cheese Slices. And what better way to use them but in a grilled cheese sandwich. I got out the bread, the Daiya and some coconut oil and got to making my lunch, but then I thought “what could make this better?” I searched around my fridge and couldn’t really think of anything to put on top, but then I spied the tomatoes I had just got from the farmers market and that sparked the idea of a tomato, spinach grilled cheese.
After I decided what to put on my jacked up grilled cheese, I wasn’t too sure how this was going to turn out with the spinach and tomatoes. Would the tomatoes make the bread soggy? Will the spinach be too wilted and turn into mush? I wasn’t totally positive this was going to be a hit, but I like to cook dangerously and I was willing to take the risk. And I am really happy I did! Not only did the bread not turn soggy, but the spinach and tomatoes were cooked just right and the cheese was melty!
The tomatoes and spinach really brought this typical sandwich to another level for me. The freshness of the garden tomatoes with the earthiness of the spinach really brought this typical sandwich to another level for me. It going to be really hard to go back to just eating a just plain grilled cheese again because this was one of the best grilled cheeses I ever had.

Summer Fresh Grilled Cheese
2 slices of Bread
2 slices of Daiya Swish Cheese Slices or any other Daiya cheese your prefer
1 tomato
Baby spinach
Coconut oil

I like to layer the sandwich with the cheese on the bread then the spinach then the tomatoes. You want to keep the tomatoes as far away from the bread as possible so it doesn’t get soggy. Also when making a Daiya grilled cheese you kind of have to be a little inventive. Daiya doesn’t melt as quickly as dairy cheese, so when making something like a grilled cheese you have to be a little patient and watchful or else you could end up burning your bread or not having a completely melted sandwich. So what I do is turn the stove onto about medium high and cook the one side until golden brown (about 2 minutes). Then when I flip the sandwich over, I take it off the heat, cover the frying pan with a lid and let it sit for another 2-3 minutes. That way the steam is trapped and helps melt the cheese.

Thanks for reading!
Xoxo -N

This is what I found when I cut open the tomato I was using! Gotta love life's little messages!  

Tuesday, August 13, 2013

Lets Celebrate with Charmed Chocolate Cupcakes!

Lets eat cake! I have something to celebrate!

It has been a whole year since I turned vegan and boy does it feel GREAT! Its crazy to think that a whole year has gone by. It feels like yesterday I was struggling to find vegan food in Sturgis, or explaining to people that, No I don’t eat cheese anymore. And by turning vegan not only have I changed my lifestyle but also my husbands. Devon now eats less meat and dairy than he used to and now looks forward to my vegan experiments in the kitchen. To think that we have saved between 150-200 animals this year just warms my heart and soul.

It was one year ago today that I was on Pinterest and came across a pin by the Regina Vegetarian Society and thought WOW this is cool. I didn’t know they had a Vegetarian Society and to think I came across it on Pinterest! Fate was on my side that day because all it took was clicking on that pin and my life was changed forever.

I had reduced my meat intake to just bacon and fish and I was still consuming dairy last July, so it wasn’t necessarily cold turkey…. Or Cold Tofurkey! (haha lame, I know!) But once I did decide to go vegan I did stick to it very strictly. So I guess kind of cold Tofurkey. Now that worked for me, but for some it might be a lot more difficult. Just think every step in the right direction paves the way to greater things. It took me three years to get to a vegan diet and once I made the switch I never looked back. To read my whole story please go to my previous posts found here and here!

Also another big reason to celebrate is that I have reached over 11,000 hits on my blog! That is fricken insane! I never thought I would be so happy making up vegan recipes for you all to try. I literally get a high from people telling me they have tried something I made, or even when someone on Pinterest repins one of my recipes. I do a little happy dance inside every time!

So to commemorate this special milestone in my life I hosted our TGIF (a family and friend get together) at my house and made it a vegan themed night. So everyone who comes must bring a vegan appetizer to share with everyone. When planning this I was kind of expecting a lot of salsa, guacamole and black bean dip, but I was surprised when no one made the black bean dip or guacamole and only one person brought salsa!

So what did everyone bring?
Mary B and Bruce – Sweet potato fries
Jenn and Sean – Cauliflower Buffalo Bites and Banana Muffins
Michelle – Veggies and Hummus
Jody and Dave – Pico de Gallo and Blue Corn Chips
Robyn and Steve – Fruit and Chocolate Dip
Me – Mediterranean Surprise Dip, Black Bean Dip, Homemade French Fries and Chocolate Cupcakes

There was so much food I was so stuffed by the end of the night. It was such an amazing feeling to be able to eat everything and not have to wonder if I could eat something. The biggest hit around the table was the Cauliflower Buffalo Bites that Jen made, they were amazing! I tried making these a couple months ago and they didn’t really turn out, so I will definitely get the recipe from her to share with you guys.
The reason I called them Charmed Cupcakes is because this was the third time trying to perfect the recipe. So like the saying goes... Third times a Charm!

I knew from the start I was going to make a cupcakes because really who doesn’t love them and what’s a celebration without cake! Plus needed to redeem myself for the cupcakes I made for my nephews birthday. I forgot about them in the oven and overcooked them so they were pretty dry. This time I was determined to make a moist delicious chocolate cupcake, that everyone would love! It was however my dads idea to make them with zucchini, seeing as it is zucchini season and we all know that zucchini is the perfect secret ingredient to make any cake moist. So thanks dad for the great idea!

I saw the recipe for the frosting on Pinterest and knew I had to try it out. Not only did it look super simple to make but it was only two ingredients and it didn’t contain any powdered sugar (something that every frosting recipe contains). Its just coconut milk and chocolate chips! And you don’t have to be vegan to appreciate the easiness and deliciousness of it. It really finished off these cupcakes by adding a rich, creamy and more chocolaty goodness.
And yes those are Toy Story Cupcake Liners!!

And did I redeem myself? I think so! Not only were they devoured but the kids were asking every 2 minutes if they could have a second one and in my books if a 4 and 5 year old love them, then they must be good!

Charmed Chocolate Cupcakes - 12 cupcakes
1 ¼ cup whole wheat flour
½ cup coconut sugar
1/3 cup cocoa powder
1 tsp baking soda
1 tsp vanilla powder
2 bananas, ripe
1 zucchini, peeled and shredded
¼ cup coconut oil, melted

Blend the zucchini and bananas together until smooth. Combine all dry ingredients together and mix well. Add the oil and banana mixture together with the dry mix and stir until well combined.
Fill cupcake liners ¾ full and bake at 375 for 20-25 mins.

Rich, Chocolate Frosting
1 can of full fat coconut milk
1 cup of chocolate chips (vegan)

Put can of coconut milk in the fridge over night. Open and remove all liquid so only the solidified coconut milk is left. Place chocolate chips in a glass bowl over a pot of boiling water and gradually melt the chocolate. You don’t want to heat up the chocolate too fast or else it will burn.
Once melted combine the hardened coconut milk and melted chocolate and stir until smooth.
Place in the fridge for 3-4 hours or until set.
Using an electric beater, beat the mixture until smooth and a frosting consistency. Top your cupcakes with frosting, serve and enjoy!

Thanks for reading!
xoxo -N