Search This Blog

Tuesday, October 30, 2012

Super Soft Banana Brownies, Vegan and Gluten Free

Something that I really love about my jobs is that I have Mondays off. I can get SO much done on Mondays, like cleaning the house, laundry and even quilting! Maybe its because my husband isn't home...

So in celebration of having a day off I was in the mood to bake something, but I wasn't quite sure what. I started to think what I was in the mood for, sweet? savory? sour? And what I came up with probably has something to do with Halloween: I thought CHOCOLATE. Not that I haven't been sneaking my vegan chocolate bars in every couple days (or maybe hours, I don't know if there will be any for the kids) but I was thinking something more substantial. How about Brownies, I thought to myself? Those sound awesome (I'm really smart)!! They will be the perfect snack for the quilting retreat I have this weekend! In which I will finally be posting something about fabric, sorry guys Food has just taken over my life lately I havent got in enough time in my sewing room. 

Gluten Free Brownie! 
I have made a lot of brownies in the past, but just recently I started doing the black bean brownies. This is where you take a can of black beans, blend them up, add them to a premix brownie package and bake them. SUPER SIMPLE, vegan, and really good. However, they can become dry, which is my pet peeve of brownies. So I got to thinking what would make them moist?

Regular Brownie!
Bananas!! The perfect solution to any baking dilemma. They add moisture and a great flavor to any baking and I just happen to have 8 bunches of bananas in my house right now. Next I thought about adding coconut milk, its dairy free and will add a rich smooth texture to the bananas. 

Now that I had my idea I just needed my box of brownies. Superstore has a great Organic Brownie mix that only has 5 ingredients and they are dairy and egg free. This is the mix I use for my black bean brownie mix. But then I thought, what about doing a gluten free mix too? You can never have too many brownies. So I bought both!!

Ingredients 
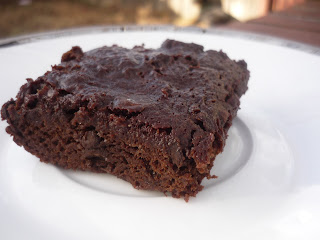
Regular Brownie! Looks so good!
1 Brownie Mix
2 Medium Bananas
1/4 cup of Coconut Milk 
1/4 cup of Chocolate Chips, vegan

Pre Heat oven to temperature listed on the box. Blend the bananas and the coconut milk together in a blender until smooth. Gradually add banana mixture to the dry brownie mix and chocolate chips, until you get the consistency of a brownie batter. If you are using large bananas you might end up not using all of your wet mixture, and thats okay. Basically you just want to add enough to get it wet and thick. You don't want it to get too soupy or else they wont set.
Place in the oven for the allotted time on the box. Let cool. ENJOY!

I did this for both boxes, the Organic Regular and the Gluten Free one and the Gluten free one turned out a little stickier, but for me thats not a bad thing. 
I loved the results of them, I don't think I will go back to making the black bean ones. 

Stella finds it hard to look at Mom
This was going to be the end of my post, however my husband informed me this afternoon that our little girl Stella broke into our kitchen and ate ALL of the Gluten Free ones. Luckily I had tried one late night so I can tell you that they turned out great. I guess I wont be taking those to the Quilt Retreat!

So I just had to post some pictures of her! And as Ron Burgundy would say: 
I am not even mad: that's amazing! 


She looks so sad


She feels really bad, and she promises never to do it again.


Tuesday, October 23, 2012

Sweet Potato & Quinoa Chili, Vegan and Gluten Free

Go To Recipe #2

As much as I love the summer months here in Saskatchewan, I do really love Fall. The smell of brisk cold air outside, the crunch of leaves and the comforting feeling of eating a hot meal to warm you up. For me nothing says comfort food more than chili and with today being the first snow fall of the season I thought it was time to share my awesome chili recipe. 


I am constantly bragging that my chili is the best. In fact, it is so good that my older sister who is a raw vegan ate 3 large bowls!! She picked around the beans, but absolutely devoured the rest. Good thing I wasn't looking forward to left overs... :) 

When I first started to cut out meat from my diet, hamburger was one of the first things to go, along with all poultry. So when making chili I just used beans and veggies but it just wasn't as satisfying. I missed the hearty feeling that chili had, and with just beans and veggies it felt like a thick soup. Then I discovered Quinoa and found a new main star for my chili. Quinoa gives the meaty texture, its gluten free and seeing as there is 22 grams of protein to 1 cup, this is something that will definitely fill you and your family up.

This recipe is super simple to throw together and if you don't have a couple of ingredients, substitute them out for other things you have in your fridge. The only thing I suggest you try and keep in there are the Sweet Potatoes which add a great chunky texture and of course the Quinoa.


Vegan Chili

1 tbsp of coconut oil
1 onion, diced
1 clove of garlic, minced
3 celery stalks, diced
2 medium sweet potato, diced
1 small zucchini, diced
5 large mushrooms, diced
1 red pepper, diced
1 large can of black beans
1 large can of kidney beans
1 can of beans in tomato sauce
1 can of tomato paste
1 large can of diced tomatoes
2 cups of vegetable stock 
1 cup of uncooked, strained quinoa
1 tbsp of chili powder
1 tbsp of cumin
1 tbsp of coriander
Cilantro for garnish


Heat the oil in a large soup pot over medium low heat. Add onions, garlic, celery and sweet potatoes and sauté for about 10 minutes.  Add the tomato paste, tomatoes, chili powder, corriander and cumin and cook for about 5 minutes, stirring until spices are fully blended in. Add the mushrooms, red pepper, zucchini, beans, stock, and season with salt and pepper. Continue to cook for about 5 minutes, then add the uncooked strained quinoa. Continue cooking for about 30 minutes, stirring frequently, or until quinoa and potatoes are cooked and the chili has thickened. Top with avocado and chopped cilantro.


Thanks for reading!!

xoxo -N

Thursday, October 18, 2012

Chocolate, Banana and Peanut Butter Vegan Cheesecake

For my birthday I was trying to decide what to do about the cake. Seeing as I am vegan and my sisters and dad are gluten free, the options of a cake are quite restricted…or so I thought! When I was on Amy’s site looking at her chocolate orange tarts, my friend Jesie drew my attention to a Chocolate Peanut Butter Banana Cheesecake. I am pretty sure I did a double take. What, its vegan?! Are you sure? Let me check the ingredients… well looky here, Amy has done it again! When you click on the link below that takes you to her website, you will see what an amazing cake she has created. It looks like a ‘regular’ cake, something that anyone would love to eat.


After seeing this amazing cake I thought. I love peanut butter! And Chocolate! And Bananas! So naturally my brain went - - - this is the perfect birthday cake. Anyone who doesn’t like the combination of nuts, chocolate and banana must be crazy, and simply wouldn’t get cake. Also luckily none of my friends have nut allergies.


I am not one to follow instructions well, in cooking and in sewing. When I see ingredients and sewing instructions my first thought is ‘how can I change this to suit me and my likings?” In looking at the list of ingredients I noticed that she used Agave, which is something that I don’t like to use in baking. Instead I chose to use dates. I like the idea of dates for the fact that they aren’t processed and they aren’t as sweet.
To substitute the dates for agave, blend equal parts water to dates until a smooth consistency, like syrup. Then you can use it as a one to one replacement, ¼ cup date puree for ¼ cup agave syrup ect…

I also didn’t have any coconut meat for the cream topping. Instead I used ¼ cup of coconut milk and ¼ cup cashews and blended them together. I am pretty sure the coconut meat would have thickened up the cream more, but the cashew mixture worked just great!


The last thing I did differently is a chocolate topping. I had left over coconut milk and wanted to use it up, and what would make this cake even better? More chocolate! Chocolate always makes things better.
I heated up ½ cup of coconut milk on the stove and when it came to a boil, I poured it over ¾ cup of vegan chocolate chips. Stir them together until smooth and spread it over the top of the cake. I had made sure the cake was in the fridge over night and was set. If I had poured the chocolate over the cake before it was chilled, it would have melted the cake. Place the cake back in the fridge for an hour to chill the chocolate, and thats it, my take on Amy's Vegan Cheesecake. The different flavors were really rich and creamy without being to overwhelming and everyone loved it! My cake did not turn out as pretty as Amy’s but it sure did taste great!

Thanks for reading!

Xoxo - N

Tuesday, October 16, 2012

Parisian Brunch feat. Vegan French Toast and Berries


This weekend was very eventful for me because it was my birthday!! I have always loved my birthday weekend, and when I say weekend I really mean weekend. I feel that your birthday shouldn't just be one day, I feel that you should try and stretch it out as much as you can. Especially when food is involved!!


When deciding what do to this weekend, my mom decided to have brunch on Sunday. I thought that it was perfect, I love breakfast food and I have wanted to try out a new French toast recipe. And of course I wanted to do a vegan recipe, so I replaced the eggs and milk for bananas and coconut milk.


Now my brunch wasn't a surprise brunch, but I was not expecting such an amazing spread of food and such am awesome theme! The only thing I was I told is to wear something black that is simple yet dressy. So when I walked into my mother’s condo I was so surprised that there was a theme at all. There were pink and black balloons, with an Eiffel tower and hat boxes decorating my mom’s kitchen. It was a Parisian Brunch! Then I was told that the men had to wear fake mustaches and the women had to wear red lipstick.


So we cracked open the bubbly, made mimosas and started on preparing brunch. There was a tower of berries, coconut milk whipped cream, vegan and regular French toast, scrambled eggs, and maple glazed ham. We were also doing gluten free French toast and regular French toast, boy there was a lot of food.


Vegan French Toast

2 ripe bananas
½ cup of coconut milk
1 tsp of cinnamon
1 tsp of vanilla (optional)


Heat up your non stick skillet on medium/high heat. Put all of the ingredients in the blender and puree until smooth. Dip your bread in the mixture, gluten free or regular bread (gluten free went over the  best in our house, even with people who are not celiac).  Brown on both sides, and serve with whipped cream and berries!
Kitty wanted to join the brunch after we all left the table,
And I don't blame her, it was good!


 All of these amazing pictures were taken by my sister Ashley from Ashley Clark Photography. 

Thanks for Reading!!

xoxo -N

Thursday, October 11, 2012

Mexican Style Quinoa and Black Bean Stuffed Peppers, Gluten Free and Vegan

This month, something was brought to my attention that just made October so much cooler. October is Vegetarian Awareness Month!! For those of you who don’t know me, I love October. And when I say love, I mean LOVE LOVE LOVE. My birthday is in October, thanksgiving, my dogs birthdays and Halloween! Now this just puts the cherry right on top!
One of the main messages that Vegetarian Awareness Month is promoting is Meatless Monday’s. This is where you go all of Monday without eating any meat. I know for those of you who are meat eaters, it sounds hard, but I swear it isn’t. I even bet some of your favourite meals are vegetarian. When you actually start looking for amazing meatless meals, you will find that the options are endless.
Some simple ideas can include:
Taking your favourite Fettuccini Alfredo and instead of adding meat, add mushrooms
Vegetarian Pizza – You could do a mushroom, peppers, tomato, olives, ect. There are a lot of ingredients that go really well on a pizza. Now is the time to be creative.
Do breakfast for supper! Who doesn’t love pancakes for supper? Pair those with some scrambled eggs or omelets and you got a great meal!

Last night for supper I was in the mood for something Mexican inspired. So I checked the fridge and I was in luck, I had red and yellow peppers! And one of my favourite dishes to make is quinoa stuffed peppers. They are quite simple to make, and if you want you can do any flavour of stuffed peppers, such as Italian or Greek.


Ingredients2 yellow peppers
1 cup of cooked quinoa
1 tbsp of coconut oil
1 medium onion, diced
1 cup of zucchini, diced
1 ½ cups of mushrooms, diced
1 medium tomato, diced
1 cup of black beans
1/4 cup of Daiya Cheese
1 tsp of cumin
1 tsp of coriander
2 tsp of chili powder
1 tsp of onion salt
 
Pre heat your oven to 350 degrees and heat up oil in a medium sized frying pan on Medium/High heat. Add the onions and garlic and sauté them for 10 minutes, or until they are soft. Stir in your mushrooms, zucchini and tomatoes until evenly distributed, sauté for 5 minutes. Reduce the heat to medium and add your spices, mixing them well into the vegetables. Finally stir in the quinoa and black beans. Continue to cook on low/medium heat for another 5 minutes.

Then take the peppers and cut them in half length wise. This will make them easier to stuff, they will lay more evenly in the pan and they are easier to eat. If your peppers are odd shaped and do not stay upright in the pan, stick toothpicks in the sides of the pepper to stabilize them.

Once your vegetable mix is ready, place your peppers in a baking pan – I used an 8 inch square cake pan. Then spoon the mixture into the peppers, almost to the point of over stuffing them.


This is the point when I remembered that I had just bought a new package of Pepper Jack Daiya Cheese. I love this stuff, it melts like cheese, tastes like cheese and would be the perfect touch to my stuffed peppers.

I took about ¼ cup of the cheese and evenly distributed it on top of the peppers. This is one of the reasons why you should make sure your peppers lay flat in the pan. Because if they didn’t your stuffing and cheese would fall out.


Now they are ready to put in the oven! Now because the inside veggie mixture is already cooked, the bake time isn’t very long. We are only baking the peppers until they are soft, which takes about 15-20 minutes or until the cheese melts. This step is really up to you, the longer you have it in the oven, the softer the pepper. I like my pepper to be a little crunchy, so I only bake it for 15 minutes.
Once your peppers are cooked to your liking, take them out of the oven and let them cool for 5 minutes. Then serve!


Thanks for reading!!

xoxo -N

Tuesday, October 9, 2012

Chocolate Orange Hazelnut Tarts, Vegan and Gluten Free

This year for Thanksgiving I wanted to bring a dessert that I would be able to eat and that I could share with everyone. Looking on Pinterest I found the most amazing dessert recipe by Amy of Fragrant Vanilla Cake. The title of her recipe is what initially hooked me, Dark Chocolate Orange Hazelnut Tart, if that doesn’t say decadence, I don't know what would.


 So I clicked on the picture and went to her site to see if it was something I could pull off. Thankfully, her ingredients and instructions were really simple and easy to follow! I have posted her recipe link below, so you can see how amazing hers turned out.  

http://fragrantvanillacake.blogspot.ca/2012/05/dark-chocolate-orange-hazelnut-tart.html


Enjoy Life is the brand of chocolate that I used in making my tart. They are listed as Vegan on the label as well as gluten free!  They are the most amazing vegan chocolate chips ever! I honestly think that these taste just as good as any chocolate bar out there. They are also nut, soy, wheat, mustard, sulfites, fish and sesame free!  


There are a couple minor things that I changed in order to make Amy's recipe:

  1. I used Quinoa Flour instead of the almond flour or hazelnut meal. The flour is mild tasting, so it doesn’t change the taste of the dessert, also its still gluten free!
  2. I substituted Coco Natura Coconut Sweetener for the brown sugar/maple sugar. Its just as sweet, and it's 100% natural and free from additives and artificial flavorings.
  3. Instead of the suggested Mandarin Napolean or cognac, I just so happened to have a mini bottle of Grand Marnier. 
  4. Finally instead of doing one large tart, I made mine in muffin tins. I love making individual sized portions, they are easy to serve and they are super cute!! However, because the portion size change when doing muffin tins, I had to double the filling in order to get a good ratio of crust to filling. To ensure the tarts were easy to remove I greased the bottom of the tins with coconut oil. 

I was extremely happy with the outcome of my mini chocolate tarts. The crust was sweet and solid, a perfect compliment to the soft, rich taste of the chocolate filling. Everyone at Thanksgiving was complimenting them and how they couldn't believe that they were dairy and gluten free. Some thought that the crust was too sweet, which is something that is easily altered in your own rendition of Amy's recipe. 
I really suggest you make these for your next family get together. They are really easy to make and yet pack a really big punch of flavour.

Thanks for reading!

xox -N 

Sunday, October 7, 2012

Quinoa Stuffing - Vegan & Gluten Free


As Thanksgiving grew closer I started to think of the things that are traditionally served at Thanksgiving supper that I would not be able to have. Last year I was only vegetarian, so it made things a little easier on me. This year however is different. So I started to think of something that could easily be converted into vegan that would still be a big hit among everyone. Then it hit me! Quinoa Stuffing! This works perfect because my sisters and dad all have celiac disease so they are unable to have gluten. So by doing quinoa stuffing I am able to make a dish me, my sisters and dad can eat. Its gluten free and if I use vegan broth then perfect, two birds one stone. 


  In the picture above there were a couple things that I forgot to add. The sage, cumin and the salt and pepper.


Ingredients

·         1 cup of quinoa
·         2 cup s of water
·         1 cup of wild rice
·         4 cups of water
·         1 white onion
·         2 medium carrots
·         3 stalks of celery
·         1 cup of diced mushrooms
·         2 tbsp of coconut oil
·         1 clove of garlic, minced
·         1 cube of vegetable broth
·         1 cup of hot water
·         3 tsp of sage
·         2 tsp of cumin
·         Salt and pepper


First you will need to clean your wild rice and quinoa. A simple way to do that is to put it in a strainer and run cold water over it.

To make the wild rice: combine rice, the 4 cups of water in a saucepan and bring to a boil, cover and simmer over low heat for approximately 45 minutes, until the rice has opened and fluffed out. Strain out any excess water.

To make the quinoa combine quinoa and the 2 cups of water in a saucepan and bring to a boil, cover and simmer over low heat for approximately 20 minutes, until the water has all evaporated.

Next chop up the mushrooms, carrots, onion, and celery into bite size pieces, and place the mushrooms aside for later. Heat up a medium/large sized frying pan on Medium/High heat, add your oil and sauté the onions, garlic, carrots, and celery for about 15 minutes, or until they are soft. Combine the hot water and the vegetable broth in a bowl and stir until the broth is dissolved. Add the mushrooms and broth, spices and quinoa/rice mixture to the pan,  and continue cooking for another 10 minutes. Reduce heat.
Finally in a large serving bowl and enjoy!  


Thanks for reading!!

xoxo -N