Search This Blog

Showing posts with label red pepper. Show all posts

Friday, July 5, 2013

Raw Vegan 'Pasta' Salad

I had the awesome pleasure of going to the lake last weekend for my husbands family reunion. The weather couldn’t have been better and it was really great to see everyone again, seeing as these only happen every 5 years.

All of the food was included with the registration fee but because it was mostly meat I brought all of my own food which mainly consisted of fresh fruit and veggies. I found that because I only brought out fruit and veggies that’s all I ate, well I wont lie, I did have some chips and alcoholic beverages! But definitely ate a lot healthier by bringing my own food.


Some of the things I brought out were ingredients for a mango date salad, some bananas, and this awesome raw ‘pasta’ salad. I originally was going to bring an actual pasta salad but I didn’t want to feel all bloated, plus I didn’t want to boil water in the 30 degree heat! So why not have a raw one and use zucchini noodles instead! They are fresh, easy to make and a lot healthier for you than the grain version.

I used my mandolin to make my zucchini noodles, but you can use a sprilralizer, a vegetable peeler or a knife!

Raw ‘Pasta’ Salad
1 medium zucchini, noodled
2 tomatoes, chopped
5-8 majool dates, chopped
½ yellow pepper, chopped
½ orange pepper, chopped
½ cucumber, chopped
1 lemon, juiced
*optional kalamata olives


Then I got home and thought about making one with a creamy sauce, still have it vegan but I kind of wanted to experiment with flavors. So on Wednesday I broke out the avocados and my Vitamix and came up with this amazing creamy raw vegan dressing!


Raw Vegan Pasta Dressing
1 avocado 
½ cucumber
2 cloves garlic
5 leafs basil
1 lemon, juiced
*optional 1 tbsp nutritional yeast

Put all sauce ingredients into a blender or a food processor and puree until smooth.Toss with the chopped veggies and 'noodles' and serve!


Thanks for reading!!
xoxo -N

Monday, June 17, 2013

Quick and Easy Curry Stew

I LOVE CURRY! Like L.O.V.E LOVE  I have made a couple different curry dishes and this is by far the easiest and best I have ever made. I know I have said this about every curry dish I have made, but honestly it just keeps getting better and easier. I was surprised at how quick this meal came together and how great it turned out. 
Like always, when trying a new dish I am always a little wary on if I will like it, but man this is good. Now, I can see a couple of you out there thinking that this might be too hard, you are wrong, it’s only 4 easy steps to awesomeness for this dish. If you are unsure of whether or not you like curry then maybe start off with no curry spices and add little by little instead. For me I used 2 tbsp of curry spice to really bring out that extra punch.

So if you are in the mood for something really fun tonight, why not try out my amaze-balls curry stew, I dare you!

Serves 2-6 people ( I ate the whole pot so really 1-6 people)


Stew
2 garlic cloves
1 tbsp of coconut oil
2 good-sized sweet potatoes, peeled and chopped
1 large yellow onion, chopped
1 large red bell pepper, or 2 small ones, chopped
1 can chick peas, rinsed and drained
1 lime

Sauce
1 can diced tomatoes
2 inch fresh ginger, peeled
2 heaping tablespoons peanut butter
1 tsp ground cumin
½ tsp ground cinnamon
¼ tsp ground red pepper flakes
2 tablespoon curry powder
1 tbsp maple syrup
½ can coconut milk

Directions:
Step one – chop up all the veggies
Step two – sauté the veggies, hick peas and oil for about 10 mins in a large pot on medium high, until almost fork tender
Step three – put all of the sauce ingredients into a blender and puree until smooth
Step four – pour sauce over veggies and let simmer for 15 minutes, the longer you simmer the thicker it gets!
Garnish with lime and serve over rice or noodles. Enjoy!


Substitutions
*coconut milk for any that you have on hand
*peanut butter for any other nut or seed butter you have
*sweet potatoes for regular potatoes


Thanks for reading!
Xoxo -N


Tuesday, June 4, 2013

Vegan Pizza Pops and Vegan Pesto Pizza

I wonder if you are getting tired of my pizza posts? I am certainly not tired of making the pizza and eating it, hence all of the recipes I have posted!
This time I made a homemade pizza pocket, or a calzone, depending on how you want to see it. AND I made a mini pesto pizza. Two for one today folks!

When you really think about it, you can do a lot with pizza dough, and by simply changing up the toppings, shape or size of what you are making, it changes the whole meal. Especially when it come to kids. What kid wouldn’t love decorating his own pizza with the toppings they love, maybe even making it have a face. Its simple changes to the meals you and your family love that make the difference between the same old, same old into something new and delicious.

For those of you who read my Homemade Pizza post, this is the same dough recipe.

Pizza Dough – 2 Pizza Pockets and 2 mini Pizzas
1 ½ cup whole wheat flour
2 tbsp ground flax
2 ¼ tsp quick-rising yeast
½ tsp salt
2/3 cup very warm water
2 tsp olive oil
2 tsp. date honey *recipe below


In a medium bowl, combine flour, flax, yeast and salt. Mix well.
Measure warm water in measuring cup, then stir in olive oil and honey. 

Pour mix over dry ingredients and mix using wooden spoon to form a ball. 
Turn dough onto a lightly floured surface. Knead for 2 mins. 
Grease inside of another bowl with olive oil and place dough inside. 
Cover with plastic wrap. Let rise in warm place until double in size (about 20mins).
Divide the dough between the number of pizza pockets or mini pizzas you would like (max 4)
Roll out dough over lightly floured surface into a circle. 
Put on toppings and bake at 425 for 15-20 mins.
**While the dough is rising I cut up the vegetables to have ready.

For the toppings I used:
1/3 sm can tomato sauce
½ red pepper, diced
3 mushrooms, sliced
½  zucchini, sliced
½ cup shredded Daiya mozzarella 

Date Honey - makes ½ cup

5 dates
¼ cup water
Blend in high speed blender until smooth, store the rest in the fridge.
 

Mini Pesto Pizza

Pesto Sauce
½ cup of cashews or sunflower seeds, soaked for at least 4 hours

1 lemon, juiced
1 clove garlic
1 large handful of spinach
5 sprigs of basil, de stemmed

Lightly chop up the spinach and basil, and throw all of the ingredients into a high speed blender. Set on medium high and blend until smooth.

Toppings
3 mushrooms, sliced
½ zucchini, sliced
Top with fresh spinach


Thanks for reading,
Xoxo -N

Wednesday, May 8, 2013

Thai Cabbage Summer Salad


A couple weekends ago I had the great pleasure of going over to a friend’s house for a ‘smoke’ night, and by smoke I mean smoked meat. Yumm…. Not so much. Haha, not really my thing, but exciting for everyone else there. Our friend just bought a new smoker and he was really anxious to try it out and Devon loves any excuse to eat something smoked.


So what was I going to make, seeing as I was not going to eat what they were having? A wonderful salad! Yup I was going to bring salad to a meat party. Don’t think I cant hear you guys out there quoting the Simpsons “you don’t make friends with salad”. Well I was and I did! Everyone who tried it said it tasted great and some (like myself) even went back for seconds!

I was really excited to make this one too, the ingredients are so colorful, and the Thai peanut sauce was making my mouth water. For me anything with a Thai peanut sauce is golden.
This is a perfect salad to make when you have left over quinoa in your fridge, a) because its one less step in making this salad b) the quinoa is already cold! c) who doesn’t love using leftover food, instead of throwing it out later on that week.  
It is such a fresh, crisp and tasty salad it is now in my repertoire of meals that I can either make at home or bring to family suppers.

If you or someone you know have nut allergies, just sub out the cashews and peanut butter for almonds and sunflower seed butter!

Ingredients  4 - 8 people
½ head purple cabbage
2 cups of cooked quinoa
2 carrots, grated
1 red pepper, diced
1 zucchini, diced
¼ red onion, diced
½ cup cilantro, chopped
½ cup cashews

Thai Peanut Salad Dressing
¼ cup organic peanut butter
1 tbsp fresh ginger, grated
1 tbsp soy sauce
2 dates
1 lime, juiced
Combine all of the dressing ingredients together in a high speed blender and puree until smooth. Pour dressing over salad right before serving and fold in until completely combined. 

Sunday, April 28, 2013

Rawkin Homemade Sushi with Wasabi


I crave sushi about 5 times a month, unfortunately we only go out for sushi about once every 2 months. So you can see my dilemma, my cravings are not being satisfied! Oh the horror! But seriously I love sushi, it is one of my favourite meals and when I eat it, I eat a lot. That’s why I love going out for sushi at DK Sushi House here in Moose Jaw, because they have 'all you can eat' for $24.00 per person. We usually get a group of 8 people together to share the endless rolls, which leads to us complaining of how full we are when we leave. My brother in law Sean usually brings up that One time we made him eat the last piece, 9 months ago, that sent him over the edge of fullness. Something that we thought he would have gotten over, but apparently not!

So one night I stopped by Ashley’s house after work and after talking for an hour, I got the craving for some sushi. I mentioned it to Ashley and her eyes lit up with excitement, she wanted to go to! But she wondered if they would make her rolls without rice in them, she just wanted the nori and the vegetables. We figured we would call and ask before going down to make sure they would and success, they said they would! We didn’t get ‘all you can eat’ because it was just the two of us, but we definitely left full!

Me eating my seaweed salad, and Ashley's no rice sushi rolls!
While there we got to talking about making our own homemade sushi, raw and cooked. I had tried making traditional sushi before with Devon, but it was really soggy and I ended up just scraping off the rice and veggies and eating it like a stir fry. So naturally I was a little apprehensive about making it again. Ashley suggested that we try making raw sushi with cauliflower rice instead, she had noticed someone else had made it and was interested in making it herself.

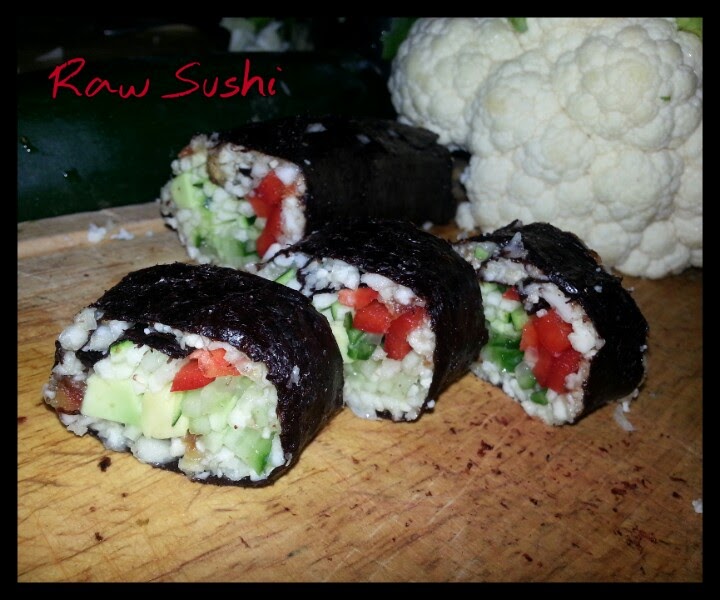
The next day I was still craving sushi and thought about just making my own. Heck I am not made out of money, so going to Sushi House again was out of the question. Luckily I had cauliflower in the fridge and was curious about how it would turn out. So I got to work on ricing the cauliflower in my Vitamix and thought “how is this going to stick together?”…. Dates, of course! So I threw some chopped up dates in and pulsed until well mixed. I rolled one up, tasted it and thought ‘WOW! Ashley needs to taste this!’ So I immediately texted her to get her butt over to my house for an amazing supper! Little did I know, Ashley was going to SuperStore to get ingredients to make raw sushi too! Great minds think alike!

We were both really satisfied with the result of the sushi, the only thing is you have to eat it immediately or else the nori wrappers get soggy. That could have to do with the quality of the paper or with the water content of the cauliflower, either way, you have to basically roll ‘em and eat ‘em.
 
Ingredients 6-10 rolls
1 pkg raw nori papers
1 head of cauliflower
5 majool dates, pitted and diced
1 red pepper
1 avocado
1 small zucchini
½ cucumber
1 bamboo rolling mat

Thinly slice all of the vegetables, using a mandolin or your knife. Rice cauliflower in high speed blender, only pulsing. Optional step, remove cauliflower from blender and pour into a bowl, take a couple paper towels and try to extract as much water as possible. Throw back into blender and pulse the dates in.
Lay out nori paper on a bamboo rolling mat, the longer side parallel to your body. Spread out a thin layer of cauliflower rice, in the middle of the paper lay equal amounts of vegetables, try not to add too much or it will be difficult to roll up. Using the rolling mat, roll up the paper tightly. Using some water to seal off the edge.
I like to have the seam of the paper on the bottom of the cutting board while cutting. Also it helps to wet your knife before cutting too!
Cut into sections and eat immediately! Serve with soy sauce, wasabi or ginger and enjoy!

After I wrote this post we went out again for sushi a few weeks later and Ashley brought something that I totally fell in love with: homemade wasabi! It tasted just like the typical green stuff you get from the restaurant, only this was all natural. I mean who would think of making their own wasabi and bringing it to a sushi place? My brilliant sister Ashley, thats who. So here is the link to her site to get this super easy recipe so the next time you make your own raw sushi or when go out you can bring your own too!

Thanks for reading!
Xoxo -N

Sunday, April 14, 2013

Vegan Eggplant Soft Tacos

Truthfully I am not a big Mexican food fan. I love guacamole and salsa but tacos, burritos, enchiladas don’t really do it for me. I will eat them for sure, don’t get me wrong, but I never really crave them.

Yesterday however I was thinking about what I wanted for supper and a couple things came to mind but I wasn’t too sure. That’s when I came across a recipe for eggplant tacos, and I that piqued my interest. I just happened to have an eggplant in my fridge that was on its last couple days, so I had to use it ASAP. Well why not eggplant tacos. That’s when I realized that I interpreted the recipe wrong. I thought they used the eggplant as the taco shell, but instead they just had a corn tortilla and eggplant inside. I guess that could work too, but my original way sounded like a lot more fun!. I love trying new food and different ways to eat the norm, and this was the perfect example.

When buying your eggplant you are looking for a large, firm and a heavy one. You don't want to be  too hard or too soft because too hard means its not ripe enough and too soft means its too ripe. Also this is when size matters, because the bigger your eggplant is the wider your tacos will be!

So not only are these gluten free, egg free, everything free (except eggplant and oil) they cut down on carbs, fat, and salt and are a fun new way to look at tacos. I will warn you now, they are messy! But that shouldn’t stop you from trying them out, if anything it should entice you! Because who doesn’t love playing with their food.
My recipe is just a jumping off point, if you wanted you could add black beans, zucchini, hot peppers, anything  you think that would make a great taco, go for it. Also, if you have taco seasoning already at home then you could use that instead of the spices I have listed. I didn’t have any in my house so I thought, why not just make it!

Ingredients - 2 servings
1 large eggplant - 8 slices
2 tbsp coconut oil
1 red pepper
1 onion
5-8 mushrooms
1 lime
¼ - ½ cup of walnuts
½ avocado

Taco Seasoning
1 tsp chili powder
1 tsp garlic powder
1 tsp red pepper flakes
1 tsp oregano
1 tsp paprika
1 tsp cumin


Pre heat oven to 350 degrees. Using a vegetable mandolin or knife slice the eggplant into ¼ inch thickness. Melt 1 tbsp of coconut oil and lightly coat the egg plant on both sides. Salt and pepper to taste. Put into the oven for 10 minutes. While they are in the oven, slice up your red pepper and onion using the mandolin. If you have one this will save you so much time! In a mixing bowl, add all of the spices together, stir until well combined. Chop up the mushrooms and throw all of the vegetables into a hot frying pan with remaining coconut oil, lime and desired amount of taco seasoning. Fry veggies until soft (the vegetables will probably be done at the same time as the eggplant) Garnish with avocado! Serve immediately and be prepared to get a little messy! Enjoy!

** If you don’t have eggplant but have a large zucchini, that would work just as good! 
** If you are looking for a vegetable mandolin I saw one at Super Store for $10.00. I got mine at Costco for $40.00 and it works awesome.

Thanks for reading,
Xoxo -N

Saturday, March 9, 2013

Homemade Vegan Pizza


I have done a couple posts about pizza because well I LOVE PIZZA! Most of the time we order Family Pizza and I get mine without the cheese. However lately I have been wanting to make my own crust, to see how the two compare. Luckily my sister in law Jennifer had an awesome recipe that she shared with me, and  now will share it with you today! 

I really loved how this crust turned out, Jennifer was right it is awesome. I tried to roll it out until is was as thin as possible because I am not a big fan of thick crust. Basically the reason I eat pizza is for the toppings, the crust is just a vessel, but this crust actually tasted really good! The recipe does call for whole grain flour, so thats what I used this time. Next time I will try my hand at a gluten free version and post how it compares! Also I used a Italian and Herb Olive Oil that I really think added the perfect flavor to the crust. If you don't have flavored olive oil but would like the flavors of herbs feel free to add fresh herbs to the dough! 


When you actually think about it, the time it takes to make and rise the dough plus bake it in the oven, is the same amount of time it takes to make this pizza. And it definitely doesn't cost $30 or $40 to make them. So I hope you can take the time to make this for you and your family one night because you wont be disappointed, I know I wasn't. 


Pizza Dough - Makes 1-12inch pizza1 1/2 cup whole wheat flour
2 tbsp ground flax
2 1/4 tsp quick-rising yeast
1/2 tsp salt
2/3 cup very warm water
2 tsp olive oil 
2 tsp. date honey *recipe below

In a medium bowl, combine flour, flax, yeast and salt. Mix well.
Measure warm water in measuring cup, then stir in olive oil and honey. 
Pour mix over dry ingredients and mix using wooden spoon to form a ball. 
Turn dough onto a lightly floured surface. Knead for 2 mins. 
Grease inside of another bowl with olive oil and place dough inside. 
Cover with plastic wrap. Let rise in warm place until double in size (about 20mins).
While the dough is rising I cut up the vegetables to have ready.
Roll out dough over lightly floured surface into a circle. 
Pinch the outer edges up into a crust.
Put on toppings and bake at 425 for 15-20 mins.


For the toppings I used:
1 sm can tomato sauce
1 red pepper, diced
1 cup mushrooms, diced
1 cup zucchini, diced
7 kalamata olives, pitted and diced
1 handful of baby spinach 
1/2 pkg of shredded Daiya mozzarella 

Date Honey - makes 1 cup
10 dates
1/2 cup water
Blend in high speed blender until smooth


Thanks for reading!
xoxo -N


Wednesday, March 6, 2013

Rawkin Cabbage Roll Wraps!

If you are someone who is just transitioning from cooked vegan to raw vegan diet, this is a recipe for you! Cabbage rolls are one of the most popular comfort food dishes out there and when making a lifestyle change like switching to a raw diet its nice to have meals that are a healthy reminder to what you used to eat. So what better meal that raw cabbage rolls? Cabbage rolls are my all time favorite meal, growing up my mom would make them for my birthday supper every year. I had no idea how these raw ones were going to turn out but I was really excited.

I do have to give my sister Ashley credit for this one guys, it was her idea and I am envious that I didn’t think of it first. We were going for supper at my moms house on Family Day and she was making cabbage rolls, vegan and regular for everyone. Ash and I were talking about eating all raw for a couple days we were sad that we couldn’t eat the vegan ones my mom made. That’s when she thought about making raw cabbage rolls. She had just bought her non pasteurized sauerkraut and was wanting to use it, and what better way than on cabbage rolls. She came up with the filling and thought we could roll them in zucchini slices. It was a good idea, but why not wrap them in raw cabbage leafs? They are cabbage rolls! So I guess I can claim 10% of this awesome idea. Yay!

I think this recipe is such a great example of how eating clean and raw can be fun and tasty. I honestly wouldn’t have thought about eating raw cabbage rolls before I turned vegan, and that’s what I love about this lifestyle, it makes you think about food in a whole new light. And even if you aren’t raw, or vegan, try this out, be adventurous in your meals because you never know what flavors you might find and love.


Rawkin Cabbage Roll Wraps! 

1 cabbage head, carefully peel off layers of cabbage so that they are whole and perfect for wrapping. 

3 cups Cauliflower, riced in food processor/Vitamix(Pulsed)- set aside.

Tomato Sauce:
1 red pepper
1 garlic clove
2-5 soaked sun-dried tomatoes
1/4 fresh lemon juice
1/4c raw tahini
a few sprigs of each parsley and oregano

Blend ingredients in blender. Pulse Blend.

Pour onto riced cauliflower and mix well.
Use as filling in your cabbage rolls, I put in two tablespoons of filling, some diced tomatoes and a little bit of unpasteurized sauerkraut. Wrap it like a cabbage roll and eat fresh. They can get a little messy, but they sure taste good!!! 


Thanks for reading!
xoxo -N

Tuesday, January 8, 2013

Juice Cleanse Day One!


I think it might have been me telling my sister I was feeling sick that prompted her to ask me to do a juice cleanse, not that it matters because I said yes. Why, you might ask? Because I am crazy. Just kidding, I am trying to reset my digestive system before I head to Cancun on Saturday, and Ashley thought that this would be a great way to do it. I was so nervous going into this that I really didn't think I would make it past day one, even though Ashley insisted that I could. Well here I am drinking my supper juice thinking, holy shit she was right, I can do this. 
THEN I think about my fruit fast and how day one was SO EASY! I was shocked that it wasn't as hard as I thought it was going to be. Then day two hit and I was all like, ohhhh this is how it's supposed to feel. Like I am detoxing, so basically tired, sluggish, with bits of energy through the day. 
Today I felt normal with no real differences in my day to day routine. I had lots of energy, felt great and at 6:30pm I just started to feel tired. I plan on finishing my juice and this post then winding down to go to bed early. Devon isn't juice cleansing but he is fast asleep beside me, maybe he is secretly doing it too....?!?!

So, this is how my day one went:

I started out my day with a liter of water and 1/2 liter of hot lemon water. I also did 50 mins of walking on the treadmill followed by stretching.

All of my juices were made by my Magic Bullet Juicer.

Pinned Image


Breakfast juice - 9am
4 stalks of kale
3 stalks of celery
2 apples
1 lemon
½ cucumber
1 cup of water


Pinned Image
Lunch Juice - 12:00 pm
12 oranges 

Snack - 3:00 pm
1/2 liter of coconut water
Supper Juice - 6:00 pm
2 tomatoes
2 carrots
2 stalks of celery
1 red pepper
1 lemon
1/2 cucumber
Handful of cilantro
1 cup of water


I am, again, a little nervous for what tomorrow has in store for me but I just have to keep reminding myself that its only two more days. Also, without Ashley here to help me I know I wouldn't have done this on my own, so thanks Ash for pushing me to do this! To be honest, day one went by quite fast and I like the fact that I only had one appliance to clean! 
I will keep you posted on how day two goes so stay tuned!

Thanks for Reading!
Xoxo, Nikki